
I’m so excited to be joining my blogging friends for the Seasonal Simplicity Christmas series hosted by Krista at thehappyhousie.com I’m sharing a handmade ornament along with 20 other bloggers and their beautiful creations. Be sure to scroll all the way down to the bottom!


German Stars
I recently learned how to fold these beautiful German stars from my friend, Sara. She has been making these (without the help of instructions!) since the 6th grade. Sara has an Etsy shop where she sells adorable crocheted items, but recently sold these German stars at our church’s Christmas marketplace. I just HAD to know how she made these, so I had her give me a lesson. It takes Sara about 5 minutes to fold one star. I filmed her making one so I could share it with you. Watch the video below!
What You Need
To make a star this size, you will need legal size paper (8 1/2″ x 14″). These would be really pretty if they were even bigger, but you would need to hunt down some extra large pieces of paper for that!
Supplies
- Legal size paper
- Scissors
- Wax
- Needle
- Popsicle stick
- A tin can and small sauce pan
- Twine
- Glitter (optional)
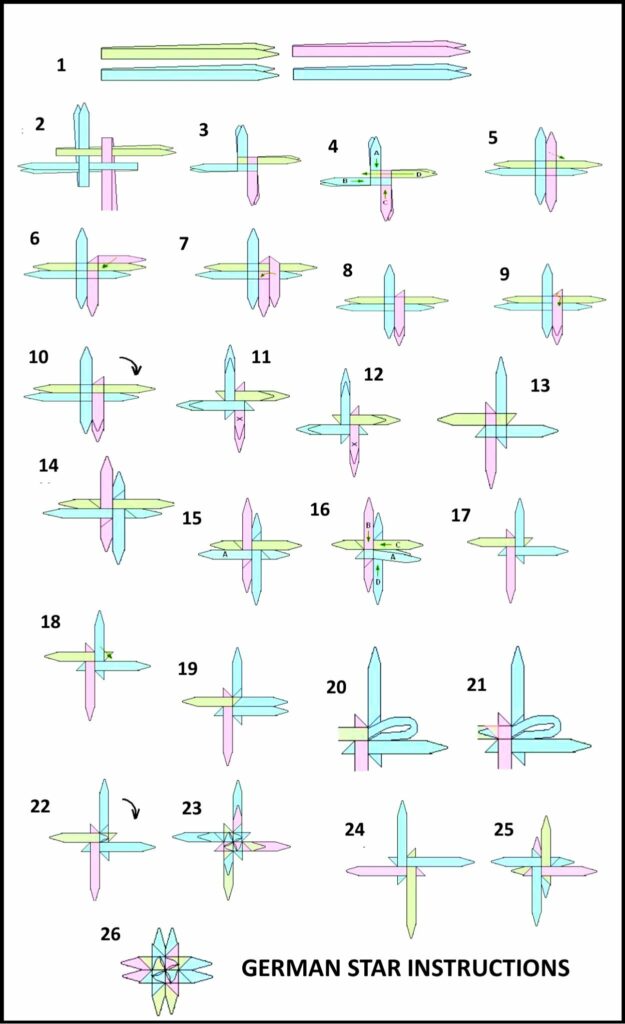
- Folding instructions (video and pictures available below)
Instructions
- Start with 4, 1 1/2″ wide strips cut lengthwise from the legal paper. These strips will be 14″ long and 1 1/2″ wide.
- Following the correct steps, fold your star and trim the extra paper.
- Poke a hole through the star with a needle and thread your string through so you have a loop for hanging.
- Create a double boiler with your sauce pan and tin can by bringing water to a boil and placing your tin can down into the pan.
- Melt the wax in the tin can.
- Hang the star on a Popsicle stick and dip it in the wax until it is completely coated.
- Before the wax cools, sprinkle with glitter!
Slow Motion Video Instructions
Picture Instructions


AND! Today I’m super excited to be sharing my ornament as part of the Seasonal Simplicity Christmas series! Check out what my talented friends are sharing today…

The Happy Housie // The Turquoise Home // Lolly Jane // tatertots and jello // Clean and Scentsible

Place of My Taste // The DIY Mommy // Tauni Everett // Life is a Party // Taryn Whiteaker

Home Made Lovely // Town and Country Living // Sincerely, Marie Designs // Grace Gathered Home // Deeply Southern Home

Finding Silver Pennies // Heathered Nest // Jenna Kate at Home // All Things With Purpose
Summer Adams
S
Thanks for sharing this. I especially like the summarized picture instructions which I saved for a nice reference!
I believe however that unless I misunderstand, it has a mistake in the written instructions: it is not possible that strips 14″ by 1.5″ are long enough–but two taped together end to end might just work.
Danke, und fröliche Weihnachten!
Terry
My 8th grade teacher had us make these (in the early 60’s) and I have treasured the one remaining ornament we had saved. We made them from plain shelf paper which had more weight …and my last one was eaten by bugs since last Christmas. So glad to find instructions and look forward to making more with my granddaughter. We also made trees by folding pages of reader’s digest…anyone have instructions for those?
Renny Crawford
These stars hung on my Christmas Tree all through my childhood! My Aunt made them for us. She has shown me how to make them and I can never remember – thank you so much for sharing this!! I can’t wait to make some for my children!
Danielle
These are so pretty. Thanks for sharing the tutorial.
Krista
These are so pretty. Thank you for sharing and joining in the blog hop.
jen hadfield
Beautiful! And great instructions!
oxo
Tauni
What a pretty ornament. I bet they really make an impact on your tree. It’s so fun to have a handmade element in the home at Christmas time :)