I have written specifically about painting the exterior of an RV, but how do you paint the interior walls of an RV? I receive numerous questions about this topic every week, so I figured it was about time I shared my tips! Here it is; how to paint the interior walls of an old RV.
About RV Walls
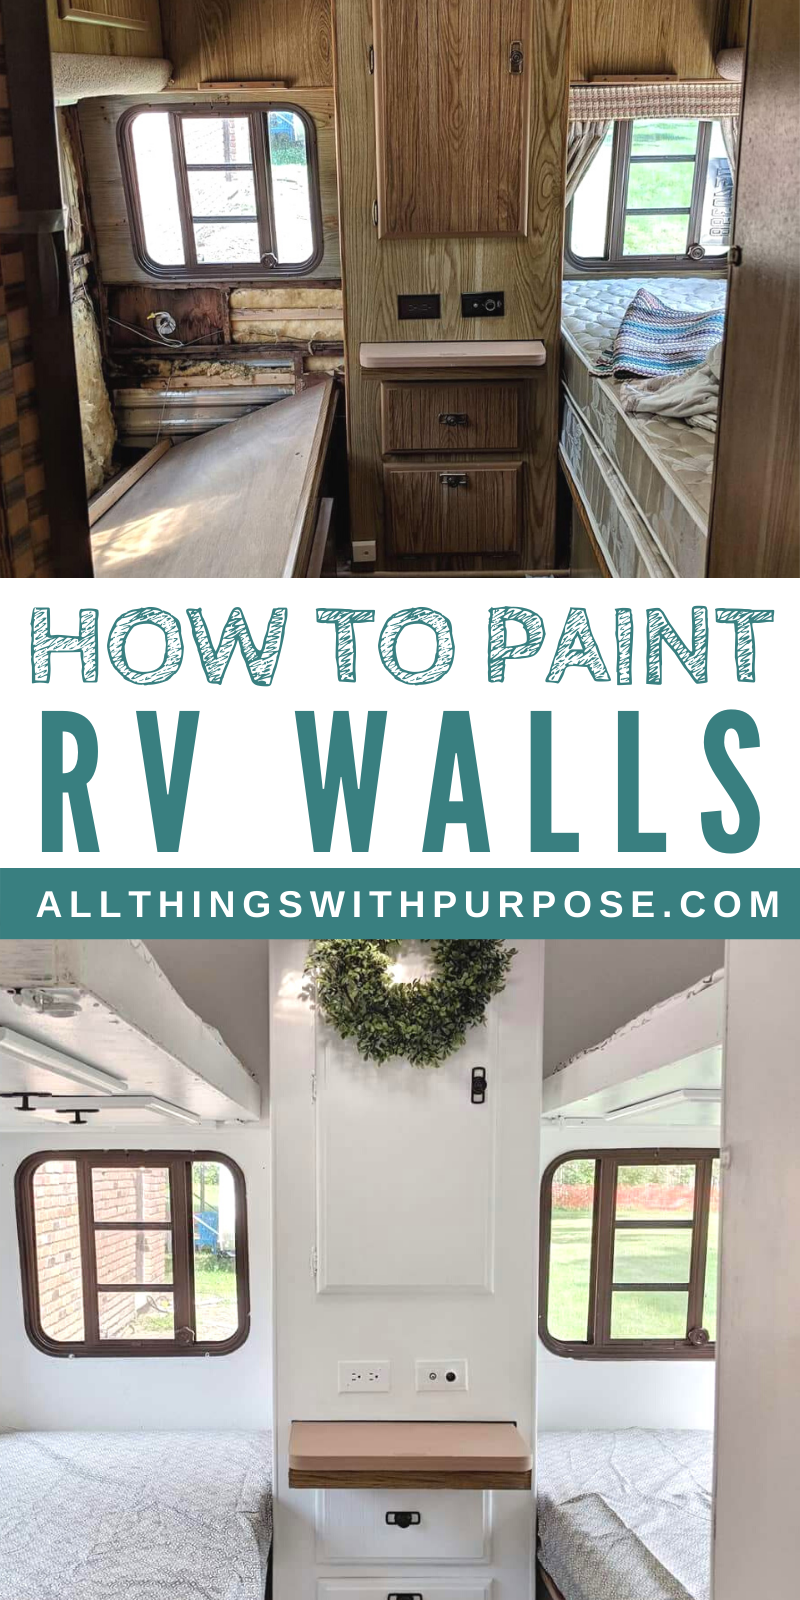
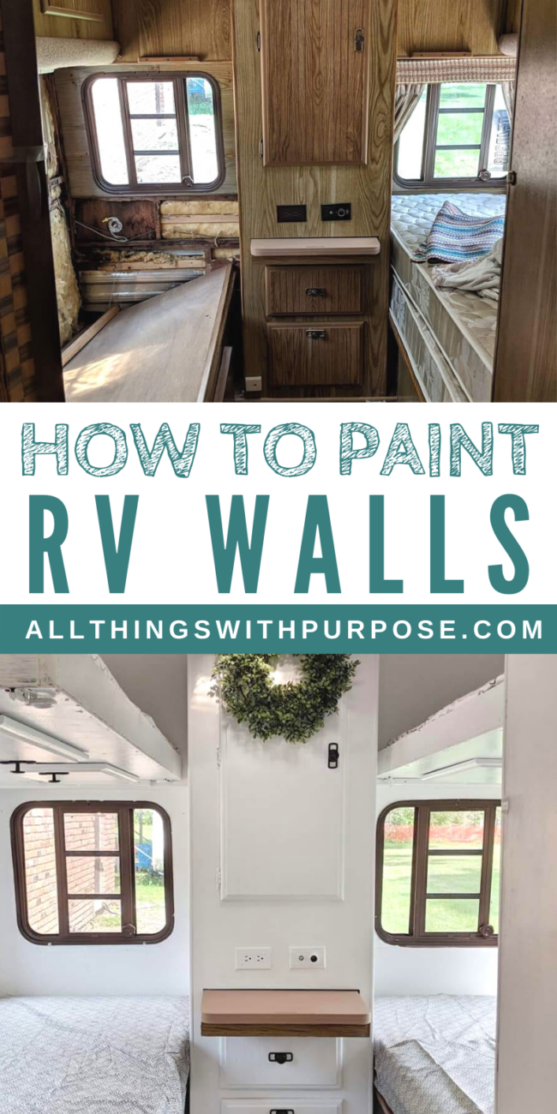
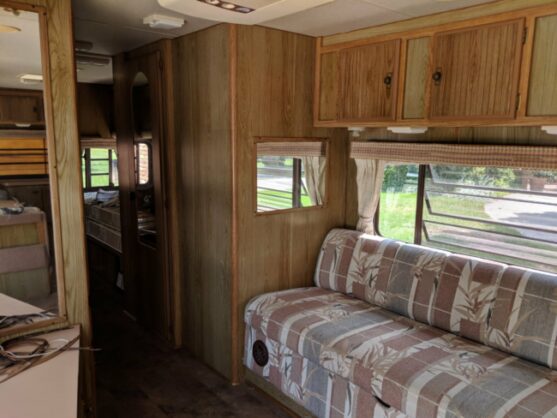
The first question most people usually ask is in regards to the walls themselves. You’ve probably noticed that most older RV’s were manufactured with either a fake wood paneling or a thin wallboard that is covered in what seems to be wallpaper. First off, do not attempt to remove this wallpaper. If you are dealing with a camper that has had some water damage or there are spots where this wallpaper is bubbling or rippling, I’d suggest you inspect this for further damage before proceeding. I have seen some rippling in the wallpaper around windows, due to aging or humidity, but not necessarily water damage. If it’s minor, I suggest sanding the area down, or using a knife to cut away the rippled area. If it is really bad, you may need to cover this area with new wallpaper, paneling or trim. But like I said, don’t attempt to peel back the wallpaper or you will have created way more work for yourself.
Read: How to Paint the Exterior of an RV
Prep Work
Before painting the interior walls of your RV, the prep work is just as important. Make sure your walls are clean, free from dust and grease. In many cases, a high quality paint will have no trouble adhering to a clean, dry wall without the use of an extra chemical. But, if you are dealing with a really old RV with exceptionally dirty walls, you may want to use a TSP substitute like Krud Kutter. If, by chance, your walls are actually covered in real wood, you may want to use a liquid sander first. This will remove the glossy finish! I really like this one.
Temperature and Humidity
One very important thing to consider before painting the interior of your RV, is temperature and humidity. Most oil based paint adheres best when temperatures are between 40 and 90 degrees. Latex paint is best to use when temperatures are between 50 and 85 degrees. In extremely cold climates, I recommend running the heat in your RV for several hours before painting. Even once the interior of your RV has warmed up, I still do not recommend painting when it is below 30 degrees. While the RV is nice and toasty on the inside, the outside is still very cold, which means your walls will probably remain fairly cold as well. This can create condensation on your walls and tricky conditions for paint to adhere and cure. The other tricky factor is ventilation. I encourage you to use a Latex, low VOC paint when ventilation is going to be challenging due to weather.
On the other hand, paint won’t adhere properly in extremely hot climates either. High humidity can be especially destructive. I have heard horror stories of paint that went on perfectly, but the following day it had literally slid right off the wall! In humid conditions, paint will not dry and may become runny. Run your air conditioner and/or a dehumidifier while painting in humid weather.
Paint and Primer
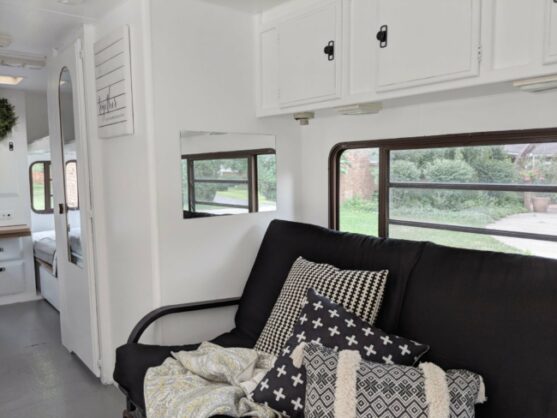
I have had great success with Behr Marquee paint and primer in one on regular walls or over wallpaper. It covers great without the use of an additional primer and almost always covers in one coat! On the other hand, I have also used a bonding primer like Stix or Gripper, and then topped with a less expensive paint. As long as your surface is clean and dull, you shouldn’t need anything fancy. If you are covering wood or plastic/fake wood or if it has any kind of gloss to it, I HIGHLY recommend using a bonding primer first. I also recommend using a low luster paint with a satin or eggshell finish. Semi-gloss will show up too many imperfections, but flat paint will not ware well in high humidity. I do not recommend using oil based paint. I tried it once thinking it would adhere better, and had problems with it flaking off.
“If you are covering wood or plastic/fake wood or if it has any kind of gloss to it, I HIGHLY recommend using a bonding primer first.
Here is the summary of what I suggest you use:
- Stix or Gripper primer over wood paneling, plastic or glossy surfaces
- Latex paint
- Eggshell finish, not flat or semi-gloss
- Clean and prep the surface with TSP substitute like Krud Kutter and allow to thoroughly dry
- Sand down or cut away any wallpaper that is bubbling or rippled due to age
- Check for water damage before painting
- Use bonding primer like Stix or Gripper if there is any sheen to your walls or if painting over any kind of wood paneling
Other Options for Damaged Walls
If you are trying to correct an area that is badly damaged or imperfect, you may want to cover it with something other than paint. Clean the surface as best as you can and then consider covering with one of these options. Disclaimer: don’t cover damage without first correcting the issue. If there is a leak, fix the leak and remove damaged wood, don’t just cover it up and ignore the problem!
- Wallpaper: I have used both peel n’ stick and pre-pasted wallpaper. I have had decent success with peel n’ stick, but it is not recommended for exterior walls that are prone to condensation due to the changes in whether. If using a peel n’ stick, it is generally recommended that you use an additional adhesive. Don’t cover every wall in wallpaper, but use it as a great accent to cover damaged walls!
- Peel n’ stick tile: I love using peel n’ stick tile in my RV’s. It is inexpensive, easy to install and doesn’t add additional weight. Check out my Amazon Store for some of my favorite options!
- Vinyl tile: I have used vinyl tiles as an accent in my vintage trailers. It’s lightweight and easy to cut. Find some here: Vinyl Tile
- Paneling: I wouldn’t normally recommend adding a lot of paneling if weight is a concern, but there are so many great options out there to choose from! From thin wood planks, to vinyl tile panels and faux brick, create the look of a focal wall that also reinforces or covers over damage.
Q and A’s
Here’s a few commonly asked questions about painting an RV interior.
Q: Should I remove the wallpaper in my RV?
A: No, do not remove the wallpaper. If there is a boarder, you may want to remove that.
Q: Can I paint over the wallpaper in my RV?
A: Yes, paint over the wallpaper that was factory installed in your RV. This is not normal wallpaper and not meant to be removed.
Q: Should I roll or spray the paint on in my RV?
A: This is entirely a matter of preference! Both rolling and spraying paint work great. Spraying will save you time, especially if you have a lot of space to cover, but it takes more prep work and can create a bigger mess. Do what you are most comfortable with.
Q: What kind of paint do you recommend?
A: I don’t think you need to spend a lot of money on paint. The prep work is more important. If you’re covering existing wallpaper or a dull surface, regular paint of any kind is fine. If you are covering laminate, plastic, or any glossy surface, you will need to sand and prime really well with a gripping primer. The paint is less important in this instance, sanding and priming is the more important step. I like Gripper primmer and Behr Ultra Scuff Defense in most situations. I also really like Behr Marquee for the one coat coverage that saves time with dark colors. I use mostly eggshell or satin finish. I use Stix primer and Benjamin Moore Advance paint when I want to get really fancy.
Q: Do I need to sand my walls before painting?
A: In most cases, no, you do not need to sand walls. The only time you would need to sand your RV walls is if they are covered in wood or paneling of any kind.
Thank You for Pinning!
Jennifer
I have a fifth wheel and we have the wood cabinets but it kind of feels like a like a wallpaper kind of stuff wood. What do I need to do to paint those?
Cydney
Hi Sarah, I am in the middle of redoing a older fifth wheel camper that we are going to live in and currently painting some of the faux wood cabinets in the kitchen area and hopefully all over if time permits, however, I am wondering what you do about the plastic pieces that go down along the sides of the cupboards I can’t seem to find anybody talking about this. They go over most of the seams on the ends of the cupboards currently, I am just painting over them, but I am not sure how they’re going to turn out or last. Also, I think it would be important to mention about the caulking that is around most of the cupboards as well and how the paint doesn’t cover that as it is silicone and the water base paint beads off of it meaning it would have to be recaulked with possibly a white caulking to cover it as most of the campers I believe are done with brown. Any advice you can give on this would be greatly appreciated. Thank you!
Sarah Lemp
Hi Cydney! I usually paint over plastic pieces with a really good bonding primer first. And I go over any hard-to-paint areas/silicone with this paintable, latex caulk: https://amzn.to/3SgMWYL
In my experience, it covers really well and then makes it paintable! You could go through the process of removing all the silicone, but I’ve never had an issue using this caulk overtop of silicone for inside purposes.
KristenS
How do you handle a wallpaper border mid wall? Do you try to remove the border or paint over and have a raised area on the way where the border is?
Sarah Lemp
Hi Kristen! I always remove wallpaper border. The bottom wallpaper layer is not removable, but borders usually are.
FLgirl
I know you repeatedly say NOT to remove wallpaper but it is so loose and wrinkly in so many spots in our 2017 Coachman Catalina!! I plan to try to peel it off because I don’t think it will adhere more with age.. Any success stories WITH removal??
Marie
I stripped the wallpaper off, lightly sanded the paneling, washed it, primed it with Kilz original oil based primer and then painted it with BeautiTone gloss white 100% acrylic paint and it has held out perfectly for over a year! I painted over the wallpaper in one area ( following the same procedure as above ) and that ended up cracking and peeling. Hope this is helpful!
Laura Amoroso
I have a question about time to dry and safely stay in the RV. How long after painting before it’s safe to sleep and stay in the RV? Assuming we use the paint and suggestions that you have offered here?
Thank you
Laura
Valerie
Hello! I have used a razor knife to remove “just” the peeling vinyl and bubbled vinyl then I used sheet rock joint compound where I removed the already lifted vinyl paper. I apply a thin coat and sand it. Repeat as needed. That technique worked well.
Rachel
I’m at a bit of a loss of what to do next. I have a little trailer and it’s a fake kinda wood laminate thing and I got the Berh Marquette paint and didn’t prime it as the lady at Home Depot said I wouldn’t need to. After two coats it was horrible still. So I primed and put another coat on. However now, I could scratch the wall and the paint would come off. Should I remove the paint and prime and repaint? I don’t know what to do.
Mary Lou
I’d try scuffing the already painted surface just to be sure the paint will adhere to it. Follow with a good bonding primer (I used Styx) & then paint (eggshell or satin, but not flat). I painted our RV a year ago following these steps & have had no problems. I think I did two coats of satin finish paint.
Britney Jones
I didn’t know that an RV interior could look so good! I need a project to do because we have a cabinet painting company coming to paint our kitchen cabinets so I need a project to do while I can’t use my kitchen. I’m excited to see how my RV looks after it’s finished! Thanks for sharing!
Pam Pawlowski
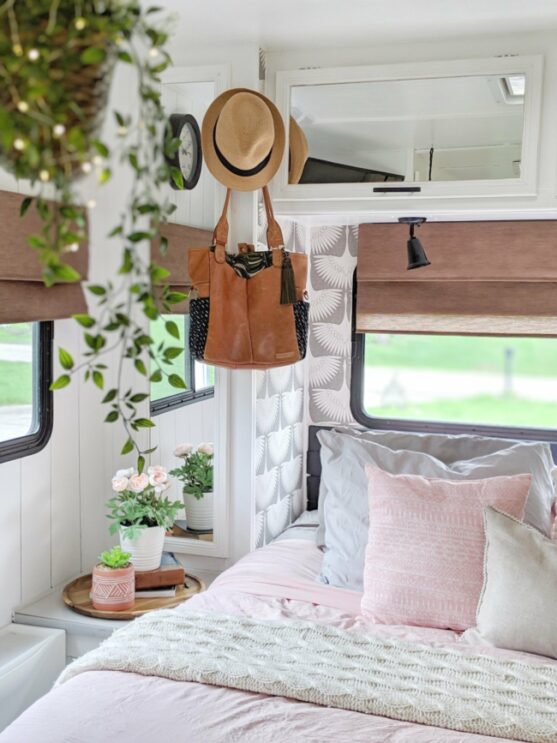
Sarah, the wood roman shades in the bedroom featured look amazing! Do you have a resource for them? Thanks for sharing your knowledge and experience!
Sarah Lemp
Hi Pam! I have several linked in my Amazon shop. The ones pictured might be out of stock, but I got them on Amazon: https://www.amazon.com/shop/allthingswithpurpose
Marie
I Sarah your ideas on painting the walls worked great for me…. have a 2005 Georgie Boy Class A which I would like to take the carpet out of the bedroom and the the vinyl flooring .. not sure how to go about removing the carpet on the slide out and replacing with vinyl planks Thank You in advance :)
Sarah Lemp
I highly recommend watching YouTube videos, joining my renovation Facebook group and the renovation course by Rachel at RV Family Reno: https://www.rvfamilyreno.com//?ref=B2kA4o4uhgs8_ use code PURPOSEBLOG for 10% off!
Carrie
Hi Sarah…great prep and product tips. I’m thinking of painting the interior with a spray gun instead of rolling. I have done a commercial project and used one before.
Thoughts?
Sarah Lemp
I love using a spray gun when I’m going to be painting the majority of the interior or during a full renovation when the mess doesn’t matter. If I’m painting around areas that are already nice and I would need to do TONS of prep to cover things up, I roll it on because it can be done so much cleaner.
Susannah
Great article! Quick question, we have an old 1990 RV and the wallpaper is coming down in some spots. In other areas it’s stuck on tight. Do I have to completely remove all of the wallpaper or is there something I can do to cover it without noticing the imperfections the old wallpaper leaves behind?? I appreciate your response! Thank you!
Sarah Lemp
You should not attempt to remove any wallpaper. If there is a spot where it is rippling or peeling back, I would cut that section off and sand down. Spackle over the top to smooth it if you need to and then paint!
Marianne R Rogers
Sarah, what type of spackle do you recommend? I have wallpaper that has peeled and bubbled and I can cut that away like you recommend. Also, I had a leak in one closet and need to replace the “wood”; any words of wisdom?
Marianne
Karen C
My Park Model doesn’t have heat from October to May. It is located 2 hours north of Toronto in Ontario, Canada. Will the paint crack in the winter? I’d love to paint my walls but the thought of dealing with cracked paint annually puts me off. Many thanks for your insights!
Due to heat peeling/cracking the wallpaper in the windowsills I painted them. The one that had peeled badly shows signs of cracks but it may just be where it had previously peeled.
Meaghan
I’m curious about this too. I live in southern Texas though, so I’m more concerned about the extreme heat vs. the extreme cold. Will the paint crack over time?
Chris
I bought a used trailer and the previous owner painted the doors. Its already peeling. What is the best way to tackle repainting it and/or removing the paint? Thank you!
Sarah Lemp
Interior or exterior? Exterior I would start with power washing and sanding down to remove any loose paint. Prime with a high quality gripping primer before repainting with an exterior paint. If interior doors, remove them and sand everything down really well. Scrape or sand away all loose paint. Repaint with Gripper or Stix primer.
Carol Russell
my camper walls have a border. can that be removed or will that create a problem?
Kendra
You should be able to just pull that right off. I’ve done it on two campers with no incident. But maybe start somewhere less than obvious, just to be sure!
Pat Rhodes
Did you spray with a little water to loosen it ? Tia
MINH D NGUYEN
Greetings,
We bought a 1990 RV, the previous owner painted all the cabinets & interiors white. While it is attractive when we bought it, now we discovered he painted everything with a single coat latex paint, without any sights of prep or prime. Things started to peel and scratch easily.
Q: can we go over the paint with primer, or as you mentioned, the Behr Marquee? Primer 1-2-3?
Thank you,
Minh N.
Marie
I’m having the same problem, did you get any suggestions? I’m desperate for advice. Thanks
Sarah Lemp
Having no idea how they prepped… I’d recommend sanding everything really well to remove any loose or peeling paint. Then, use a bonding primer or Behr Marquee.
Barto
Hello,
Hope you and the family are well.
How have you dealt with painting the plastic piping between the cabinets and walls/ceiling? Also the wider plastic trim on dinette frame?
Thanks for the great info and inspiration!
Kelly Hasz
I am also wondering about the plastic piping and plastic trim…paint? replace?
Sarah Lemp
Hi! I have painted right over the plastic piping using Gripper or Stix primer. See my other reply for more :)
Sarah Lemp
Hi! I have painted right over the plastic piping using Gripper or Stix primer. The same with plastic trim, though I’m not exactly sure which type you are referring to on the dinette.
Kimberly Savoia
How does the paint hold up without priming or sanding the walls first?
I prefer your way of painting considering the work involved in sanding and priming first.
Sarah Lemp
Painting the walls without priming and sanding has always held well for me over time. It’s the wood paneling and other surfaces that NEED sanding and priming. If it’s wall board or thin wallpaper, a paint and primer in one has worked well. You will get a different opinion on this from everyone you ask, but in my experience, paint on the walls has held up well. It’s all the other surfaces that need more prep!
Sue Godfrey
How do you deal with the caulking?
Debbie
Have you ever painted the ceiling? Any suggestions?
Sarah Lemp
Yes I have! I have used the same paint that I used on the walls. I also painted a CARPETED ceiling: https://www.allthingswithpurpose.com/rv-problem-solving-painting-a-carpeted-ceiling/
Lynn C
Hi, just love your pictures and can’t wait to paint my interior of my travel trailer!! My concern is the cabinets – would cabinet paint be better? Have you every used cabinet pain? My concern with all the use they get will the satin behr paint hold up to wiping finger/hand prints off? I’ve used Behr Marque on all my rooms in my home and I love it. My travel trailer is 8 years old – but is dark inside.
Sarah Lemp
I used BM Advanced cabinet paint on my kitchen inside my house and it has held up well. In my campers, I always sand or uses a liquid sander, gripper primer and regular paint. I’ve never had an issue! I’ve never had an issue with satin paint either, but it’s a preference. I just don’t like the look of a glossy finish on most surfaces. Semi-gloss on cabinets would not be bad though!
Katie
If the wallpaper isn’t in bad condition do you just paint right over it?
Lori Wordell
Hi, Katie, I just painted my motorhome wallpaper walls. I did use bonding premier and then a good paint. Do remove the boarder. Lightly sand. It turned out great! It was pretty easy and so worth it! Hope this helps.
Brian Roblow
You are really amazing and great ideas in your head! Thanks for the info
Cindy
My cougar wall paper is falling off walls. Can I peel it off and redo it with peel and stick wall paper? Or paint walls?
Robin
I love the grey headboard but I can’t figure out what its made of or by what material. Can you please let me know. Thank you!
Susan B
What is a good white color for RV interiors-not too stark and not too yellow??
diane loomis
swiss coffee
Lori
I have followed your steps to paint our walls & cabinets in our motorhome using the same products! The primer is sticking the the walls but not the fake panels of of wood! It’s scratches off! What do I do?
Sarah Lemp
Hi Lori! Did you use a deglosser or cleaner on the walls first? Hopefully they weren’t too glossy before painting. Keep in mind that paint can take up to 30 days to fully cure (temperatures and humidity can impact how long it takes). As it cures, it will harden and make it less likely to scratch off. If you are still concerned, you might try topping with a polycrylic clear coat for added protection. I like using this one: https://amzn.to/2BS40zc
Erica Stock
Hi Sarah, I love your Roman shades! Where did you get them? We just purchased a 1970 vintage RV that we’re just starting to fix up and these would be perfect to replace the yucky curtains we inherited with the rig :) Thank you in advance!
Linda Hummel Marr
Hi Jerry, we have a 2006 Okanogan 26 ft. It has a fabric ceiling and it’s a creamy white in color. I have tried to clean it a number of times over the last 14 years. But it still has stains from the air conditioner and the stove. What can we do to paint or cover up the fabric?
Sarah Lemp
Hi Linda! Did you see the post I did on painting a carpeted ceiling? Maybe that would work? https://www.allthingswithpurpose.com/rv-problem-solving-painting-a-carpeted-ceiling/
Jerrie
I am considering purchasing a 1999 motor home. It has some upgrading, but has leakage and I was told they will put the coating on top as soon as it stops raining. I don’t know anyone to check this out, just me. How can I tell if it is water damage or old age. I kind of trust the guy selling it to me, but he is a salesman. I also really enjoyed all your information. I new I WANTED to paint in and now I know I CAN….IF I buy it. I’m also not sure what it would be worth.
Sarah Lemp
Hi Jerrie!
First off, I would just assume that this camper still leaks, because ALL campers at some point will leak. Campers are known for having leaks and once you become fully aware of that, I feel like it actually helps take some of the stress and anxiety out of it. Just know that with any camper, you HAVE to stay on top of caulking and resealing things every year. With that said, you really just need to assess how bad the damage from the leak actually is. Do you have a friend that has ever owned an RV that could look at it with you? I have a post that gives a checklist of things to look for, find it here: https://www.allthingswithpurpose.com/how-i-make-money-flipping-rvs-on-facebook-marketplace-tips-for-buying-and-selling/
Sarah
This is also so helpful! Thank you. What about the plastic trim? Did you just paint directly on top? Thank you!!