
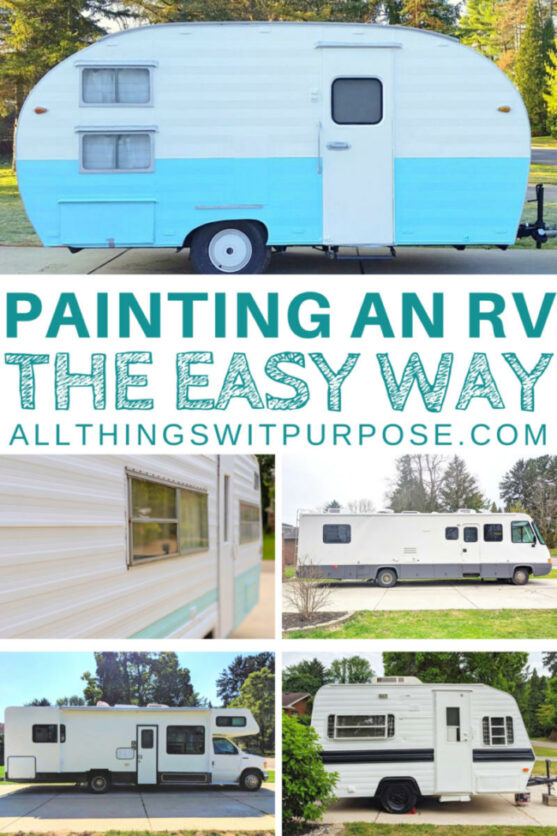
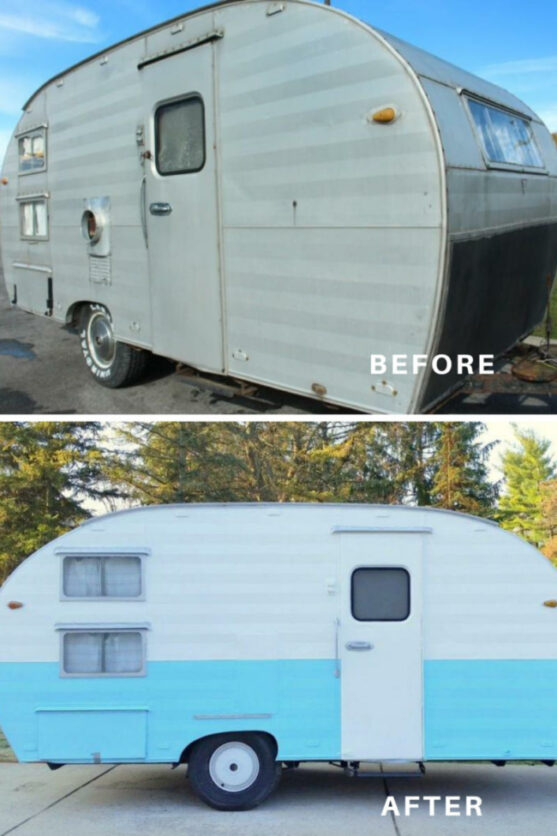
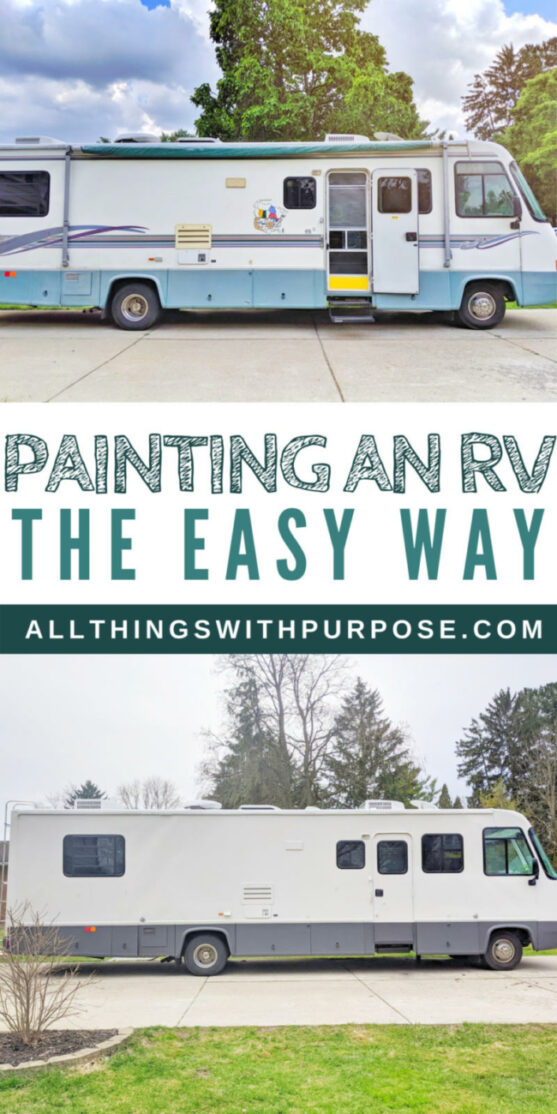
Do you want to know how to paint the exterior of your ugly RV? I have painted the exterior of multiple campers, from a vintage trailer to a 90s motorhome. I’m going to share the simple technique I use to paint the exterior of an RV and how well it holds up!
Let’s Talk Exterior Paint Jobs
How do you paint the exterior of an RV? Do you spray it or roll it? Do you use a special auto body paint? Do you seal it with some sort of top coat?
How I painted the exterior of my RV is the most frequently asked question I get, and the one I’m most embarrassed to answer!
“Why?” You may ask.
Well, I kind of break all the rules.
I realize I’m going to get some flack for this and some people are going to shake their heads and raise some eyebrows.
I don’t follow the rules for auto-body painting and maybe not even for camper painting.
Here’s why…
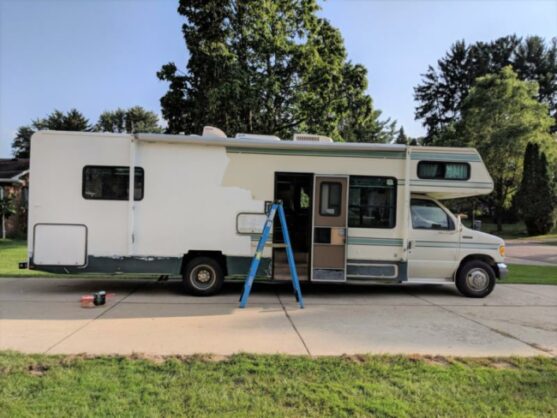
I roll the paint on using regular exterior paint, and you can too.
That’s right.
I don’t spray it, I don’t use auto paint.
I don’t use a foam roller, I don’t tape things off.
Sometimes I don’t even remove the decals (gasp!).
You can shake your head in disgust now.
Go ahead, you know you want to.
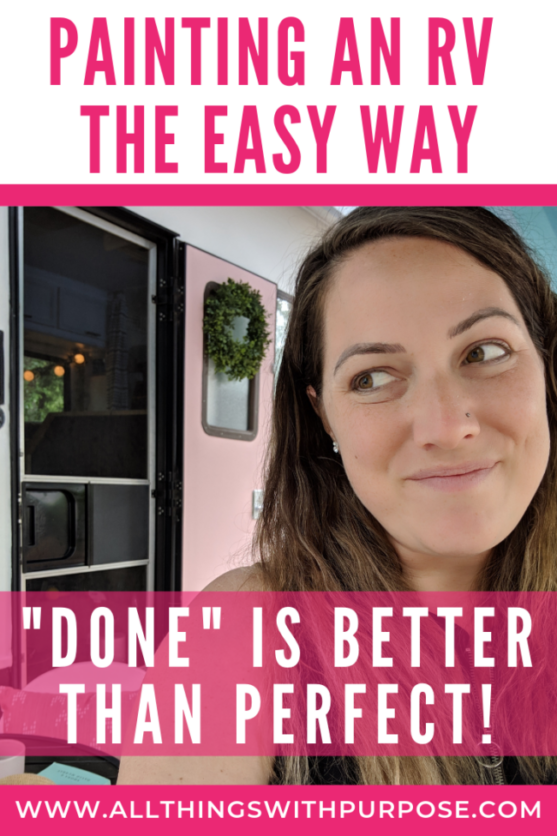
“Done” is better than perfect!
Q: Is it perfect?
A: No.
Q: Is it way better than before?
A: Yes.
Q: Am I embarrassed to be seen with it after it has been painted?
A: No.
Q: Was I previously worried about being mistaken for a mobile meth lab?
A: Yes.
Q: Am I worried about it now?
A: No.
Q: Does it hold up?
A: Yes.
The “Right” Way
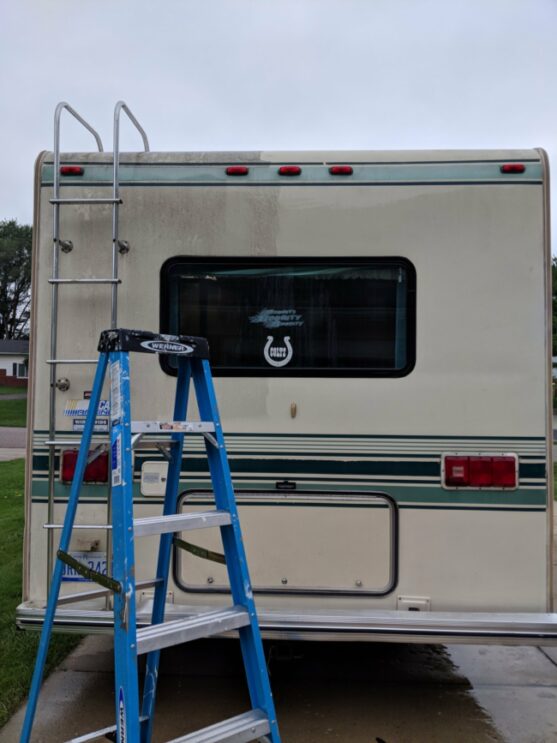
I always assess a project before diving in and using any one method. I will always inspect the decals and attempt to remove them first. Generally, I follow the rule that if the camper is less than 20 years old, I’ll remove the decals before painting. If you would like to attempt to remove the decals, you will want to try the following supplies:
- Decal removing wheel
- Or this one
- Goo Gone
- Sticker remover spray
- WD-40
- Plastic scraper
- Label and sticker remover
- Heat Gun
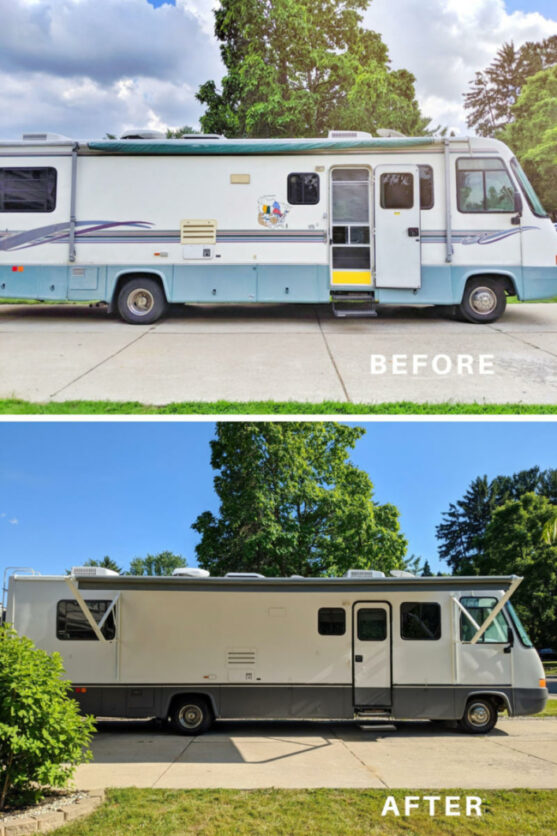
The proper way to paint an RV exterior involves removing decals, power washing, taping and covering windows and then spraying on an automotive grade paint with a paint sprayer. This might be the correct way to do things, but I honestly believe it’s not the only way. I’m all about using whatever method you can confidently execute. If rolling on paint is in your wheel house and the idea of using a paint sprayer is too intimidating, then let yourself off the hook.
When Not to Paint
If a good power washing transforms your RV and gives it new life, skip the paint job! If you can successfully remove decals and find your RV looks remarkably better, then skip the paint. If your RV is less than 10 years old, chances are you shouldn’t paint it. We now own a brand new travel trailer that I would never dream of painting, but we did remove the decals! TIP: Decals come off easily on brand new RVs because they haven’t baked on over time.
When You Should Paint
If your motorhome looks like a rolling meth lab, you should paint. If you’re embarrassed to go anywhere because of how bad your RV looks, you should paint. If the exterior is damaged and you’ve had to do repair work that left obvious patches, you should paint. If you’ve been turned away at certain campgrounds based on your RV’s appearance, you should paint.

Prep
Here is what I do to prep the surface before painting:
- Lightly sand areas where the decals are bubbling or peeling up
- PLEASE NOTE: you can try and use a heat gun or a decal removing buffer that fits on a drill to remove the decals first. I have personally had very little success with removing decals, so I’ve opted to paint over them many times! This will really depend on the year of your camper, what kind of siding you have and type of decal. I figured if they’ve stayed on for 20+ years, they can hold up to a layer of paint.
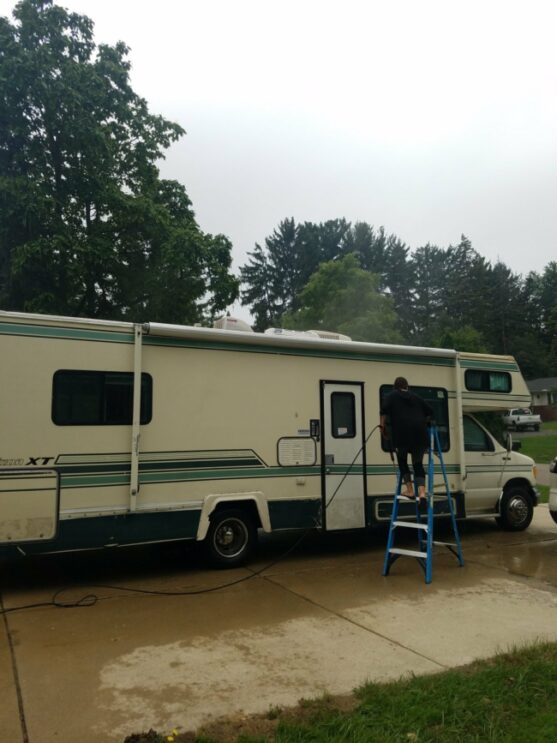
- Power wash everything, including the roof
- Allow to dry thoroughly
- Seal up corners and around all windows with a paintable caulk. I like DAP Extreme Stretch Sealant
- Do any repairs to the roof or siding before painting. Make sure everything is water-tight and clean
- If you are repainting a newer trailer with a shiny exterior, you may want to consider lightly sanding or painting first with a primer like Stix Bonding Primer
Read: Our 90’s RV Renovation
Decals
Let me talk for a minute about decals. I wasted an entire week of my life trying to remove the decals on our Salem Cruise trailer. I bought a special decal removing wheel for my drill, I used a heat gun, I used a putty knife, you name it. Those things would NOT come off. Now, the siding on that particular trailer was wavy, not smooth. I think removing decals from a smooth-sided trailer is easier. I vowed that day never to waste that much time again. I will always inspect decals and attempt to remove them, but if they look like they aren’t going anywhere and the camper is more than 20 years old, I will likely just paint over them.
Does the paint hold up around the decals? Well, I would say for the most part it does. Our much older RV with smooth sides is holding well. The newer trailer with wavy sides started to lift a little and I had to touch up the paint. I think newer decals may eventually bubble and lift, but if your RV is older than 20 years, they stay put. It’s really hard to predict what your exact situation will be.
Can you see the outline of the decals under the new paint?
Only when you stand very close.
But not bad enough to bother me!
Read: 1980’s Vintage Trailer Renovation
Paint
I always recommend the use of a good gripping primer first, because it’s hard to predict how well paint will adhere to different surfaces. If you are painting straight over an aluminum-sided trailer, you will want to use a primer that is meant for direct-to-metal application. With that said, I have had pretty good success with Behr Marquee exterior paint and primer in one. It goes on nice and smooth and covers beautifully without the use of an added primer or extra coats. It has almost always been covered in one coat and held up well.
I used a low luster sheen (eggshell) on the exterior of our 50’s vintage trailer because there were so many dents and imperfections in the siding and I wanted a finish that would camouflage them better. The drawback to this is that dirt doesn’t slide off or clean off as nice as a high gloss. I used a satin finish on our newer trailer and semi-gloss paint on our current RV exterior! I’m always experimenting.
I was reluctant to paint over the decals on our current RV with a semi-gloss paint, but I wanted to see if a semi-gloss would appear more professional. I’m not sure I really see much of a difference.
Read: Upcycled Vintage Radio to Multipurpose Bar Cart
Supplies
- Gripping Primer
- Latex Paint
- 3/8″ nap roller (you could also use 1/4″ nap or a foam roller for a smoother finish)
- Angled brush
*I experimented with an oil based paint once and it cracked and flaked off! Oil based dries to a harder finish which may be too rigid for a moving vehicle (at least that’s my theory).
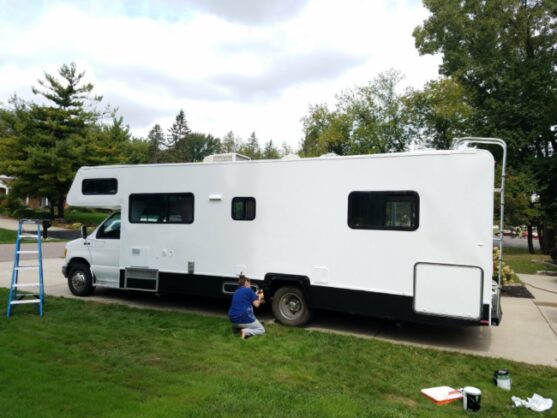
Painting the Cab
Are you wondering if I did anything special for the cab of our RV?
Do you really need to ask?
In all fairness, I did stop and contemplate it for a while!
I considered all the crazy things I have painted in the past and wondered if painting a CAR with a paint roller was going to look super trashy.
In the end, I just went for it and never looked back!
Read: FOR SALE Updated Salem Cruise Lite
Pros and Cons to Rolling
So why did I choose to roll the paint instead of spraying it?
Well, I’m just more confident with a roller.
I’ve never been a fan of taping and covering everything up to protect it from the over spray. It’s just easier for me to cut-in around everything with an angled brush and roll the rest on. Would a sprayer produce a more even, smooth finish? Probably, yes. But, because of painting over the decals, I have always figured the roller will produce a slightly textured finish that will hide the decals.
Read: Vintage Vs. New, Pros and Cons of Owning a Vintage Trailer
Finishing Touches
Once the paint has dried and cured, I added fun vinyl decals! I made sure the surface was clean and dry before applying. They have held up great with no special sealant needed. I also got a fun vanity plate for the front of the camper. I also painted the door pink!
Find them here:
How Well Does it Hold Up?
I am always asked how well this method holds up. In my experience, you may have little spots that need touching up after a season of travel, but overall it holds well. The spots that show signs of wear first, are around the headlights and front bumper of a motorhome, and around the latches and handles of storage compartments. These high traffic areas take quite a beating, but even so, I have only ever seen mild chipping happen over time. Overall, I feel that the improvement I get from painting and ease of this method are worth a few little chips here and there. I always keep paint on hand for touch ups. To extend the life of my paint job, I top with a soft wax.
Are you about to paint the exterior of an RV?
Please let me know if you have any other questions!
Pin-It for Later!
Shandis
What kind of paint did you use on the pink door? Exterior?
Sarah Lemp
Hi! Yes, just Behr exterior latex paint over a good bonding primer. I followed the same steps as the rest of the RV.
Jennifer Deacon
I want to paint the interior front door of my 2023 2205S mini-lite camper like you did the pink door in black. What sheen should I go with (satin, eggshell, semi-gloss)??. The interior door is not smooth but has a dimply texture to it and it is white.
Thanks
Dan Mitchell
This is really cool! I can see how there are limitations on what kinds of campers you can paint using this method, especially newer fiberglass with the gloss. But yours came out great! nice work.
Dianne Michele Dumas
I have been thinking od using a roller. But, I live in a windy area. There is no place to pull the RV inside. So, trying to spray in a windy area, might damage outer property.
Susan Osborn
I spent the summer of ’22 painting the exterior of my 1992 Toyota Motorhome. It was a long process during which I had to rush out to protect it from rain a few times. I had to remove the Eternabond from all the seams first, which was the worst part of the process. But, after it was all done I was very happy with the results. I used a good primer that was supposed to stick to everything, then a marine paint. Did it in white, painted over the 30 year old decals, painted the bottom grey and added a red stripe above the grey. Then it sat all winter in the snow. Now, I am dealing with many places along the trim on the corners where the paint has been lifted by the new sealant I added after painting. I am so discouraged. I can only assume that the weight of the snow on the roof caused the sealant to move and pulled the new paint off with it. Because I sealed after painting, it is leaving spaces where water can get in, so I need to redo most of the seams. So disheartening after all the work I did last summer. I’m now in the midst of pulling off sealant and scraping the loose paint away. I’ll be sealing first, the repainting those areas. I had planned to start the interior makeover of our Arctic Fox trailer, but that is now on hold until this tedious job is done. the paint on the flat surfaces looks great, it’s just these darn seams.
I just thought I’d leave a comment here for anyone else who is wondering about which to do first. From my experience, seal first, then paint.
Sarah Lemp
Thank you for your input, Susan! I’m so sorry you’re facing such a discouraging situation. From my experience, sealing first with a flexible water-based caulk, then an exterior latex primer and paint works best! The time I used oil-based exterior paint, it flaked off within a year. Latex paint without anything extra fancy has held up well for going on 10 years! I remove whatever I can, sand and power wash the outside. Then seal and use a good bonding primer before finishing with exterior latex paint.
Samantha Nichols
The trick to painting the outside of an RV depends mostly on your patience and having steady hands. A little knowledge of spray paint helps a lot too. Before you start painting, you need to prepare the surface to be painted. A little preparation ahead of time will make this whole project a lot less complicated than it should be. This can also lead to better results.
Samantha Nichols
loved reading your article. wish to see more in the coming days.
Connie King
I just “found” your site and got very excited because you had a picture of what looks to be like our 1996 coachman leprechaun! It was given to me by my brother in Alaska and it’s an incredible shape, but old! In fact, my best friend and I (both in our mid 60’s) drove it from Anchorage to Raleigh! So it’s sound! Can’t wait to read more, and hoping that you put paint colors! ☺️
Anne
Hi,
I have a flat metal motorhome Safari Sahara 1996. Diesel. Low miles. I need to sell it. One side is perfect the other has pealing top coat. I want to try and paint over the top coat. I have sanded down but still has edges showing of the top coat. I know I could mix the paint to match three different shades. No decals it was auto body painted on. Did you have problems with any top coat showing through?
Jolene
Hello! I’m so happy I found this post. I just bought a 1991 Fleetwood Terry Resort 5th wheel camper. Even though it’s in great condition, it does in fact look like a meth lab. I am planning on painting the exterior as well as updating the interior. This is something I’ve always wanted to do but it’s overwhelming now that I actually have the opportunity. I was thinking of working on the outside first because it’s summer and the weather is right but maybe I’m too far ahead of myself.
CC
I just demo’d and refurbed a 1996 Jayco Eagle 10 to repurpose as a rolling concession stand. First order of business was getting the decals and paint off to repaint. After trying many things, the ONE thing that worked the best was good old industrial strength acetone from Lowes on the baked on decals and a heat gun on the “just old” decals. Acetone also removes paint very, very well on aluminum, so entire camper was stripped. Really happy with my new baby.
Sandra Wiarda
I am going to look at a 1969 Mo 10 camper 10 feet long. Weight about 985 pounds. The interior has a light pink stove & fridge. It has water marks in an upper corner inside. Was told it had been resealed. They were asking $3200. I put in an offer for 2150. It was accepted. Now. My son and I go look. He will be checking underneath. Me. the inside. Thoughts?
Terre Simpson
You are an amazing and daring renovator! I am about to dive into painting the exterior of my 2013 Rockwood Mini Lite 2109S. Planning to do the bottom third turquoise, the top white and the door candy apple red. It is fiberglass–no easy lines like the metal camper–so do you tape to make a straight line? The Home Depot paint lady told me Frog tape won’t take off the fresh paint, but I’m worried. How long do you wait before taping to do the other color?
Thanks!
JP NEWELL
Do u know Platinum 5th wheel, if so have decals dying off it is 95460 love where we have it Mendocino CA is there anyone outthere in CA that is reliable?
Gemma
So glad I found this. You have inspired us. Bought a beauty yesterday, Fiat Ducato 1989 and the interior is fab. Body showing her age, hell I can relate. Going to paint her and few little decals thanks to your advice. Lots of prep, prime and seal and away we go!
Kelly
Have you ever dealt with exterior water damage like delamination?
Alyssa
I am actually getting ready to paint the back of a vintage RV that a home was built around in the 50s or 60s. It’s a commission project that my friend has hired me to do her property. I do not want to spray and I want to use exterior house paint. I was so happy to see your article. My only issue is that I am going to be painting a window on and some other little details and I’ve never painted on the wavy metal like that. Any tips for that? I am an artist and paint on the regular but not on a large scale nor on a trailer with variegated-type metal. So I’m keeping my fingers crossed that it will turn out well. We are going paint shopping today! Feel free to give me any advice LOL
Lynn
Love to see the results of your painting!!!!
CarHamro
loved reading your article. wish to see more in the coming days.
Janelle A Wolfenberger
I have a screen room on the front of our camper and I wanted to paint the stripes in it to make it look more like a living room. The decal stirpes are brown and tan, How should I go about it?
Thanks for your info, Have a good and Godly day.
Peter Lencioni
Do you need different paint for the roof?
Anna
I used the latex paint to really seal the roof!
TRICIA SISCO
I am in the process purchasing a 1983 RV. I will be painting the exterior. Any help is appreciated. I am not a by-the-book kinda a gal either.
Tricia
Carol
I have a 1993 Class C that I painted with high gloss exterior paint. That was 3 years ago and I did a custom leave/ flower design for trim. I’m ready to paint it again in a retro 50’s design. This time I’m using automotive paint as I’m sure it will hold up longer and this will most likely be my last time painting it as I’ll be 69 in December
ANNE LEE
PINK Door ! I am so good with that. Thanks for your instructional post, it was like listening to a bbf.
Phyllis
Hi Sarah,
I bought a 1969 Scotty Serro that is painted on the bottom 1/3. The rest is the shiny aluminum. The paint on the bottom is peeling around the bottom. I am wondering if it will all peel eventually and if I should take it all off and start over OR take off what is peeling and be creative with paint. I tried to copy a pic so you can see it. Any input is appreciated. Pics can be found on my FB page.
Phyllis
Robbin
We used your technique and paint type and it worked so well for us! Thanks for sharing!
shawn
I noticed you painted the class a motorhome and i was curious about how much did it cost roughly
Tim Falter
This was done in 2020, what’s been the longevity of the paint job. If I paint it and keep the RV for a while, how long have you had the paint job last and how long till repainting.
SueKay
I have a vintage streamline Empress to redo. There is an old stove there but it is rusty an I would like to know what kind of stove would you recommend. Thank you
Jeff G
does the Behr Marquee exterior paint and primer in one work on a fiberglass camper?
Diane STRONG
We want to add a darker bottom to our white fiberglass trailer, to update it. Would you use the behr marquee paint on fiberglass? Sand or seal first or trust the sealer incorporated in the paint? Thanks for your reply!!!
Bre
Love all your exterior painting ideas! I’m following your guide this weekend to paint our RV. It does have some paint chipping off. Should I use a sanding block to take it off?
Larry Rondeau
Just purchased a 1989 Winnebago Sun flyer to fix. Thank you for your step by step suggestions how to paint your RV. Glad to hear you had good success with Behr Marquee exterior paint and primer in one. I am also going to install Solar 200 watts panels and 1000 watt inverter so it works with the existing Power Converter. Do you have suggestions how to make it all work together? Again thank you.
Brittany
Hello! How has your paint method held up in Colorado weather on the smooth sided RV? Would love to paint mine this spring, but I am in Alberta and am worried about the results over time after the hot summer/cold winter outdoor storage!
Thanks!
Maria Palan
Well, so far so good. The RV exterior is not totally smooth it’s fiberglass- we cover it in the winter. Just uncovered it last week and all is good.
Nicole
Love your renos. I also have a rolling meth lab and would like to paint. It is fibreglass and I am also wondering if you have painted on a fibreglass RV.
Thanks
Maria
I have a 1984 Pace Arrow and painted the exterior last year. Home Depot stain resistant exterior paint. If you want to see pix let me know where to send. We did a mountain theme (live in CO) . Turned out really AWESOME.
Michael J Hardy
I wouldn’t mind seeing the pictures of your RV, I have an ’88 South wind and really could use a face lift, I am leaning really hard to using a roller and with that one I know I could get some grandchildren labor from them. I’m not equipped to use a spray gun and think I can get a decent finish with the roller. Thanks, Mike
Christina
HI! Your renovations are beautiful! We are a week into ours and like you said, it looks like a rolling meth lad, lol. I have fiberglass rv, were any of yours fiberglass, and did you use special paint for those?
Thanks so much!!
Patty Shipsey
Question: You mentioned using a ‘soft wax’ to extend the life of your paint job. How’s that working for you? What type of soft wax have you used?
Thanks. beautiful remodels!
Joseph Quintana
We have a1977 kit Companion, that we want to paint it, can we use Rustoleum spray paint?
AnnMarie
I remember my grandfather hand painting his car (with house paint or something) when I was little. I asked my mom what he was doing and I thought it was strange. But, they remembered the depression and were constantly in that mindset. So thank you for that memory, that side of the family was involved maybe 5 or 6 times while I was growing up.
Kate Manser
Hi! How long does it take you for the project of power washing, taping, and painting? No decal removal. Trying to figure out how much time I should budget. I realize it differs based on size of RV and # of people, but if you could give me an idea of how long it took to do the bigger rig I would be grateful!
Maria Palan
It took me 5 days to power wash, 2 base coats and the mountain mural. I didn’t need to tape as I brush painted it all by hand with the exception of the roof that I rolled. Weather participation helped as well. 28′ Pace Arrow 1984.
Chuck
Hello ! I just painted my 2005 Class C Fun Mover by Four Winds. I started by removing the decals, which took about a month using a variety of methods, including heat gun, plastic razor blades, putty knives, and Rapid Remover (easily the most effective adhesive remover ever!).
Then after a Winter in New Hampshire, I drove to Texas and started the painting.
First sanding with 180-220 grit. Then cleaned with denatured alcohol. Then primed with STIX. Then used Benjamin Moore High Build acrylic paint( 2 coats).
Everything looks great, EXCEPT for the condensation drops which streak down the surface every morning, especially on the cab over…) !
So now, my question – can I put water based polyurethane over the paint to make it shed water better? Will it stop the water from staining the paint? It’s starting already to look like a permanent rivulet, although once the Sun hits it, it does improve…
HELP !! Anyone !!
Charles Hammond
Found a product called “Nyalic” RV anti-rust clear coat. It comes in spray, cans and kits. Appears to be great stuff ! Here’s the web site:
https://www.nyalic.com/About-Us_ep_7.html
Jeffrey Bonds
Sarah,
Just finished ready the painting my RV article and was left with the feeling of “hey, I can do this”. THANKS.
Jeff
Pennu
What’s kindness of paint did you use?
Thanks!
Maria B Palan
I used Behr Exterior Stain Blocker in the eggshell finish. Cleans up well.
Jennifer
I’m getting ready to paint a 1998 truck camper we have gutted and remodeled. It is the ribbed aluminum siding and it has some dents and dings with one side having some hail damage which I know is quite common on the aluminum. I bought special paint and primer at Sherwin-Williams and I told the guy it had dings I wanted to hide and that’s why I didn’t mind just rollering and not spraying a nice mirror finish. Well, before I knew it he made up the paint in eggshell so that it would not highlight the dings. Later I got to thinking that it might not wash up well. Now that you have used eggshell, satin, and semi-gloss….what do you think? Should I buy a different gallon in a more glossy finish?
Sarah Lemp
Hi Jennifer! That is a tough call. I have used eggshell for the same reason – hoping to hide imperfections. I would say it is a little harder to clean up, but not bad enough to switch to a glossy necessarily…
Jennifer
Thank so much for the reply…and your experience. It sounds like the difference won’t be too dramatic. I think I will give it a try and if we hate it I can always try again. Lol!
mike
have you tried airless sprayer?
Amanda
What color is your pink door? I love it!
Frank Digacomo
I painted my càmper and was asked to leave our campground.
Carol
Seriously!
Would you be willing to post a pic of your camper?
Bob
This is very encouraging! Years ago I painted an old fifth wheel camper and the paint lasted well for several years with no peeling. I’ve also painted over the stripes on a few older aluminum campers with good success. I generally use Zinsser Bulls Eye 1-2-3 primer and have color coated with different sheens. I have used a roller because I like the texture and it gets into the texture of the metal best. I brush cut-in the edges.
Did you say you’ve used some wax? I haven’t tried that yet. What kind of wax works on latex paint?
Stacey
Hi!! I hope you don’t mind me asking, approx how much did the final product cost! Thank you!
Maria
We just painted our 1984 Pace Arrow and it cost us $284. I however did a mountain mural on it with 3 different colors. Turned out FABULOUS! Used Behr paint as well but the exterior stain blocking one, took 2 coats of white ( used for the base color).
Blanche2000
I sure wish we could upload photos to this site. I would love to see your mountain mural. I was thinking of doing the same thing to mine.
Sarah Lemp
You should both join my renovating group on Facebook and share your pictures there! https://www.facebook.com/groups/camperrenovating
Sarah Lemp
I’d love for you to join my renovating group on Facebook and share your photos (if you haven’t already)! https://www.facebook.com/groups/camperrenovating
Debbie
Great information and I’m glad there are brave people like you to do it first and tell us how it went. I totally agree with your philosophy. Thanks for sharing.
Chris Pederson
Thanks for the tip to paint over the patches where repair work was done. My RV got a couple of dents in from a hail storm. I’ll get it fixed and painted so it looks good as new.
Michael Brown
Fantastic info! Just redid our 1964 Zipper with way and people are amazed. The before and after pics tell the story. Thanks so much!!
David Smith
Great article ! Just got more than what I wanted actually! great job Sarah! I applied paint without a primer and it didn’t go well :( . I’m going to do it again! I’m gonna rock this time! B)
Martin
Hey, what’s up with the soft wax? Which one you use. I just finished my painting and like to do something on top to extend life of it.
Suzanne
Oh My Goodness – I’m so glad I found this!!! Have just spent untold hours scraping and heat gunning to finish getting a TINY percentage of the decals off of my 1995 pop up camper… after the second time I burned my hand on the heat gun I thought “There has to be a better way!!!” – I’m totally going to use your easy method… and your “Done is Better than Perfect” is also my life motto :)….
Hannah
Hi Sarah, I love this tutorial thanks! Have you found that campsites will now let you in with the exterior looking better no matter the age? I wasn’t sure if their rules are based on looks or just a blanket restriction no matter if it looks good or not.
Mike
I used a can of white “Tractor Supply” tractor paint. Rolled it on with a foam roller. Worked great, paint looked good. I had small decals that I just held a power sander on and sanded them off. I love what you have done…
Eileen
A guy spray painted this scamp I need to know if all I need to do is sand and paint the same way on this fiberglass scamp! Thank you
Sarah Lemp
I would sand it really well and power wash it, use a good gripping primer! Hard to say without seeing it or knowing what type of paint he used.
Holly
Thank you for writing this! Your before and after transformations are fantastic! I LOVE this article and we’re about to embark on our own first “nothing left to lose” old-RV-meth-lab painting adventure. I’ve read through all the comments, but I still had one question: what if your exterior rubber window gaskets/ edging around the glass still seal well, but the original white rubber is now dirty and stained permanently from mildew and age? Have you ever painted the rubber edging black or white around all the windows? How did it hold up? Thanks so much!
Sarah Lemp
Hi Holly! I have touched-up faded black edging, but never painted black over white. You could definitely give it a try, or purchase new. I’ve seen it for sale at RV surplus stores.
Mikeinto
I ABSOLUTELY LOVE IT :)))) YOU DID SUCH A BEAUTIFUL JOB:) I WILL MAKE SAME THING LOL :))))
Betty
What kind of paint do you use on doors? The paint doesn’t want to stick on them.Do you prime or sand first?
Starlite
The paint jobs really make them look nice. I am, however very skeptical that it holds up very well for any length of time.
Michelle
Thank you for all of the helpful details. I could have sworn I saw another one of your posts that told the color that you painted the inside of that door the pink/coral door. I can’t find it anywhere. Do you remember what color that was? I just purchased a similar color from a Pinterest inspiration but it’s over the top. I love your pop of color.
Linda K
How is your exterior paint holding up? How long does it last? We are picking up our class C RV today and planning to use your method!
Judi Christopher
“Amen Sista” I agree with you 100% … I have been “Flipping” RVs for 30 years, and am doing 2 right now. A vintage 1972 Aristocrat Travel Trailer (used the same colors you did. Great minds think alike) & 1985 Class A Pace Arrow 30′ (that really was a meth lab, looks exactly like the “Break Bad” RV). I always use Wall Mart semi gloss Exterior paint.. but now I also use Water-base Polyurethane to seal it, I put glitter in the Poly to also put on the countertops LOOKS Beautiful. I have “Flipped” 25 RVs, Travel Trailer and/or UGLY houses…
Thank you for sharing this post.
Malerie Lindsey
Have you ever used this method on an aluminum sided trailer? Thanks
Justin
You use the polyurethane to seal the pain on the outside as well? Painting countertops with the exterior paint?
Maria
Does the polyurethane turn yellow in time?
Maria Palan
Why if you’re using an exterior paint do you find you need a polyurethane to seal it? I just rehabbed my exterior with Behr Marquee and Stain blocker exterior.
Emalee Hopkins
This may be a silly question but did you also paint the roof? Any special attention paid to the undercarriage as well? Just starting out and found a cute little 1980s tow-behind to renovate. Your blog has helped me feel confident that I can take on this adventure :)
James
You’ve done such a wonderful job! Thank you for sharing. We are following your lead with our 2003 20′ smooth side travel trailer. How much of the Behr paint did it take to cover your “newer” trailer?
Sarah Lemp
Every trailer I have done has taken between 1 to 2 gallons. If I’m painting with 2 colors, I always buy a gallon of each with a little left over for touch-ups.
[email protected]
I was wondering if you think if a darker shade than white like a grayish green would hide the decals better ? Mine is a stationary unit and I am thinking of going that color with white trim.. Another question I believe my rv is laminate. Would you recommend a light sanding . And I was thinking maybe using zinser primer one or two before using semi-gloss laytex. Then sealing with a poly acrylic varnish. What do you think. I am just like you about taping., it is so much easier to use an angle brush and a roller over a sprayer.
David
I have a ten foot 1955 Scotsman that needs paint bad. The inside still has the beech but I was thinking of copying the original design. Is spraying hard? Should it be oil base?
Shannon Blizzard
I am going to go for it! We have a 1994 Class A (flat front..not a ‘truck front). Someone covered the lower half with vinyl and it still has a hint of a gloss….just a hint. So I will probably prime the bottom with my handy dandy Zinser primer that I used to prime the entire interior cabinetry and walls. After reading your post my hubs agreed and said “it can’t look worse!”
Samantha Nichols
Thanks for sharing, I really like your article as well as ways that were shared by you. I will try it to paint my parents’ RV exterior.
Samantha Nichols
I used your way to paint my RV with vintage colors and I really satisfied with it. But I am worried about a problem that how to keep my RV’s color for a long time. Can you recommend some ways to me?
Annika Wilson
Hello! Wow- “thank you” doesn’t seem to express the depth of relief I feel reading this post. I wanted to try all the things you have tried for exterior paint on our rig but then would talk myself out of it… until reading this. I just needed “permission” to try I guess. I happen to like using a spray gun for painting projects. Do you see any down side to trying this?
Thanks in advance,
Annika
Marissa
Hey! We’re using this post as our guide to paint our 1999 TT tomorrow! We are prepping tonight yay!! What grit sandpaper do you recommend?
Gary Tapken
if you heat up the paint it will go on a lot better & flow easyer. A friend of my discover this trick yrs ago painting a car. they had used a paint brush & left streaks & runs. So put the can of paint into hot water. Hey be careful how hot you get that water,& have the lid up. PLEASE experiment with this !!!! You will get it . Good Luck !!!
Dorothy
Thank you for the post. Every single issue describe in the post. Thank you for te sharing this post.
Ronda
Sarah… I’ve read through this entire page and can’t see that you did any repair of dents or scratches. Have you ever done that… and what did you use? We are on our 3rd RV renovation and this one is needing more exterior work than we have had to do in the past. I love what you’ve done and I love your chutzpah!
Sarah Lemp
Hi Ronda!!
I guess all I really mentioned was that I do repairs first before painting. I spend time inspecting everything first, sealing up any leaks, caulking along all seams and windows, etc. I haven’t dealt with too many dents or scratches. I have used Bondo once, find it here: https://amzn.to/2w9FSpr which can be a little tricky, but it’s probably the best option for dents, other than trying to pop the dent back out using one of these: https://amzn.to/2U1T9Jv Another thing you run into with RV’s, is delamination, which I’ve had minor cases of but haven’t really attempted to fix it. Find some great videos here: https://www.youtube.com/results?search_query=delamination+repair+rv White paint really is a miracle worker. I was told once that there’s a reason contractors use white paint so often! It does a great job at making things disappear. I also use low luster paint so that any remaining imperfections aren’t highlighted by a gloss. Hope that helps!!
‘
Lisa Dzienkowski
Hi, thanks for posting all this great information! I followed your recommendations and painted my little guy, but I am concerned about the paint not truly being sealed. Do you use a clear coat sealant as a final step? If so, what do you use? Thanks again!
Sarah Lemp
You could absolutely use a clear coat! I never have – I figure exterior paint is meant to hold up to the elements and can be painted on the outside of a house without a sealant, so why not an RV?
Kari
I inherited my 1987 dad’s C class motorhome and I have referred to your blog over and over as I have reno’ed the interior. I don’t know if I have the courage to paint it with exterior house paint! How has yours held up?
Joy
Also wondering how the paint has held up over all? Idk if this was answered
if so, sorry for the repeat of asking.
Alexa
Did you remove the decals from the front truck?
Larry Davis
DONE is better than PERFECT. Good job girl! Out here in Oregon, because of living costs, I’m seeing more people live in RV’s full time. Not the best situation, especially in the winter. But they are making it. Good to know you improve the looks of your home with minimum costs. Thanks.
Jason Bosch
Had to comment to say Thank You! I had just received two $12,000 bids to paint my 2003 Rage’n toyhauler with aluminum panel siding, and then I saw your post and it encouraged me to try it out. It came out amazing! I used a Wagner Paint Eater to get the decals off pretty easily, and I used the paint eater and a coat of Gripper primer on the second and third colors after the first color portion seemed a little too easy to remove with my nail the next day. Same combo had worked wonders on the interior with slippery fake wood cabinets.
Definitely comes out with a better texture when the paint is rolled instead of brushed. The roll gives it a nice textured finish. The Satin sheen I chose is a little too shiny for all the old imperfections. Would probably have used Eggshell if I had to do it again.
Like you said, it’s not perfect, but no longer looks like a meth lab. I’m actually proud of the exterior now. Wish there were a way to upload my before and after pictures?
Sarah Lemp
Hi Jason!! That is awesome to hear! I am so glad it worked out for you. I would love to see the results. You can email me them at al******************@***il.com or join my facebook group to upload them there: https://www.facebook.com/groups/camperrenovating
Betty Pennington
Thank you!!!! I have 9 RVs to paint and so happy to hear I can roll them. Xoxo
Kailyn
Hi there! Do you know roughly how many gallons you would need for a 24′ camper? I was hesitant about painting ours, but after reading your blog I am so excited!
Sarah Lemp
Hi Kailyn! It might be close, but it’s possible you could cover it in one gallon!
Robbie
Hello I’ve read your post several times now as I’m going to be following your tutorial. After lots of internet research I do believe yours to be almost identical to my project (95 four winds motorhome and looks almost the same!) and I really like your results! I suppose I’m mostly worried that I may do a poor job and my neighbors will think its hideous! Lol. So I guess my question is, how have your friends, family and/or neighbors reacted to it? Is it generally positive? Can they tell it’s a home job or would most people have no idea.
Sarah Lemp
That is a great question! Honestly, the reason I usually fix the outside of my campers first is purely for the benefit of my neighbors. I know not everyone loves the look of an RV being stored next to or behind a house, even if it is legally allowed by your city. I know there will always be someone that disapproves of the look, even if it’s a brand new RV. So, my goal is to make it look as less of an eye sore as possible. I have had LOTS of friends, family members and even mechanics that have been impressed with the paint job. Any time we took our RV for an oil change or for new tires, etc. We always got lots of positive feedback. I would just caution you to play it safe with white, black, gray, etc. If you try to do anything too crazy or use bright colors, you risk looking tacky. I always think, how can I make this blend with the rest of my house? I’ve even used the same colors of my house as accent colors! From the road or even standing next to it, you can’t tell it was rolled on by hand. I’d say most people have no idea.
Ron Booker
I like that you said that decals held up great without the need for using any special sealant. My friends and I are planning a vacation and we want to take the RV. I’m going to suggest to them about making some restorations to it to avoid failures in the way.
Benita Swisher
Hello,
I just sent you a comment on how to paint the exterior then I found this post so no need to answer the previous comment. Your campers look great in picture but I have to ask how do they look in person? My Class C is for me and I do not plan on selling her so I am extra scared about painting her – I need to find some courage. You have done well!!!
Sarah Lemp
Hi Benita! All our campers have been used by us first, and sometimes with no intent to sell until we get the crazy idea that we want to reno another one! LOL Every paint job I have done has drastically improved the way the exterior looks. I have had lots of compliments too. If you inspect it really close, you might be able to tell it’s not a professional job, but overall I have been really happy with it. I would just keep it simple – I’ve seen some paint jobs that were really ambitious and looked tacky. If you go with white, you can’t go wrong!
Sally
Great post!
I’d like to second Jane’s question about fiberglass. I have a 60s Santa fe and it’s fiberglass. Thanks.
Monica Skaar
I will try with our 1992 model that loose her paint as tears in the rain :D Thanx!
Judy Blizzard
I recently purchased a 2003 39′ trailer that doesn’t move from the campground and this is all new to me. Learning a lot here which is great as mine really needs a facelift, especially outside as a wash leaves the aluminum showing so a paint job is in the spring planning. Going to take a little time to get everything I want to do to it done. Thanks for the info.
Sarah Lemp
Thanks for commenting, Judy! Have fun with your fixer upper, it will be tiring at times, but the end result is worth it :)
Janet
I have a small vintage camper, not sure what the maker of it is. I only have a serial # found on the tongue. It is somewhere in the 50s or 60s I’m guessing. It has 2 doors both with wood screen doors. So cool.
Anyways, i was wondering if you ran into rust around the wheelwells and if so how do I fix them?
Thanks,
Janet
Sarah Lemp
Hi Janet! I have encountered LOTS of rust. On our 1956 vintage trailer, we had a mechanic reinforce the frame where it was so rusted that it wasn’t structurally sound. Around the wheel wells and underneath, I used a wire brush to clean off anything that was flaking off. Then I used a undercoating spray to stop rust and protect it long term: https://amzn.to/2lyIAzg I have also just used regular Rustoleum spray paint that covers rust really well!
Apexa
Did you remove the lugs or paint straight over? Does it make it impossible to change a tire?
Sarah Lemp
Hi! Are you referring to the lug nuts on the vintage trailer? I painted the outer cover, not the actual lug nuts.
Jane
Thank you for posting the information about painting your trailers. They look fabulous. Are the outside of the trailers fiberglass? Mine’s a 2000 Citation and it says it is a high gloss fiberglass and I am hoping the Behr paint will work on it too.
Bailey Strempel
Thanks for spreading your experience. Great tips explained. Covered almost every little aspect. Hope this might help campers and hikers. I really appreciate your article, you have given a good insight and a clear picture.
Tammy Blanchette
Thank you for your post. You gave me the courage to repaint my 1988 Lazy Daze Class C. While it took a lot longer than I expected, it turned out great.
Benita Swisher
I have a 1987 Class C with chipping striping did your RV have striping if so was it in good shape or chipping like mine? When you painted over it was the chipping really apparent? Just trying to get the courage to do something with my RV’s exterior.
thanks
Sarah Lemp
Mine was chipping too! I just power washed everything and sanded really well around areas that were chipping. You can try removing the decals first, but that’s up to if you have time and energy for it!
Kim
Hello! I love what you have done!! Beautiful! How did you do the ship lap?
Thanks!
John R
I’m getting ready to renovate vintage class c and am wondering how the paint has held up on the cab? Are you able to wash it or power wash it without the paint peeling right off? I’d love to see some close up pics of how the can turned out and how the whole paint job is holding up. Trying to figure out which route to go with the paint. Thanks!
Sarah Lemp
Hi John,
I actually filmed some shots of how the paint is holding up on the cab and will posting about it soon! We have power washed it and taken it through a truck car wash several times and the paint has held pretty well! There are only a few little spots on the hood of the cab where the paint has chipped. I was really rushing against the clock when I painted it in late Fall last year, so it was on the cold side and rather humid. I think that might have affected the holding power just a bit. I’m touching things up now that it is warm and dry.
Sarah
I am just LOVING reading your camper reno posts!! We just purchased an older (early 90’s) camper and I have been inspired to give it a facelift! I’m wondering if you used the same marquee paint to paint the poles for the roll-out shade cover?
Sarah Lemp
Hi Sarah!
I DID use the same Marquee paint on the poles. Because the poles were a glossier finish then the rest of the camper, the paint has not held up great. There is some chipping in certain areas… it’s not terrible, but in the future I think I’d recommend using sanding them down and using an extra primer if the poles are glossy. I was in a hurry and skipped all the extra steps.