• Skip to main content
  • Skip to header left navigation
  • Skip to header right navigation
  • Skip to after header navigation
  • Skip to site footer
  • Start Here
    • About
    • Contact
    • Media Kit
  • Blog
    • All Posts
    • Natalie
    • Taylor
    • Carissa
All Things with Purpose

All Things with Purpose

RV Renovations and Family Travel

  • Shop
    • Amazon Storefront
    • My Online Store
  • At Home
    • Crafts & Sewing
      • Doll Clothes
    • Decor & DIY
    • Homeschooling
    • Lifestyle
    • Parties & Seasonal Celebrations
    • Recipes
  • RV Renovating
    • Renovated RVs For Sale
    • How To
    • Tours
  • ON THE GO
    • Theme Parks
      • Ride Guides
      • Universal Studios
      • Disney World
      • SeaWorld Orlando
      • Cedar Point
    • Travel Tips
    • Camping
    • Cruises
    • Florida
    • Michigan
    • California
    • Hawaii
    • NYC
  • Popular Posts
    • How To Paint RV Walls
    • How Much Does it Cost to Renovate an RV
    • Basic Dress Pattern for American Girl Dolls
    • Our Favorite Spots in Northern Michigan
Home › Blog › Easy Burlap Wreath Tutorial

Easy Burlap Wreath Tutorial

Sarah Lempon August 22, 2012(updated April 19, 2023)4K+
Yet Another Burlap Wreath All Things with Purpose Sarah Lemp 5

Burlap Wreath Tutorial

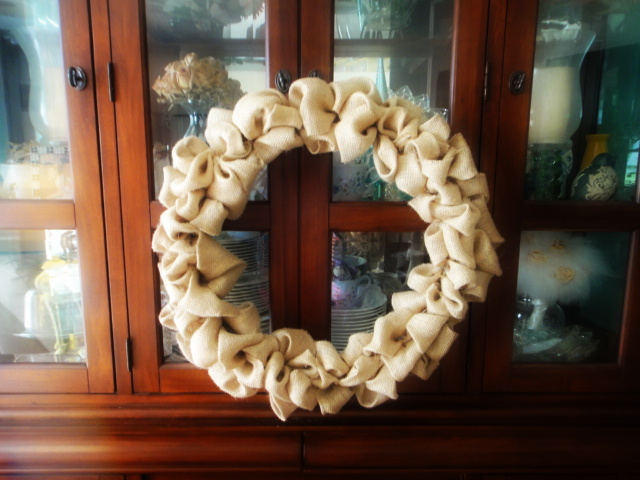
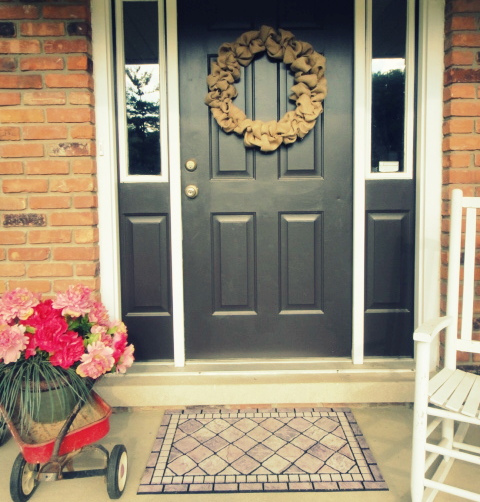
The first time I made a burlap wreath, I used an old metal coat hanger. I thought I’d get all professional and splurged on a 2.99 metal frame from Hobby Lobby (that’s right, didn’t even use a 40% off coupon). The frame created a wreath that is much larger than the coat hanger, but I like the looks of it on my door! This one is for a friend, but I had to try it out. Check out my original tutorial here!

Yet Another Burlap Wreath All Things with Purpose Sarah Lemp 9
Yet Another Burlap Wreath All Things with Purpose Sarah Lemp 4
Yet Another Burlap Wreath All Things with Purpose Sarah Lemp 3
Yet Another Burlap Wreath All Things with Purpose Sarah Lemp 2
Yet Another Burlap Wreath All Things with Purpose Sarah Lemp 1
Yet Another Burlap Wreath All Things with Purpose Sarah Lemp 10

How-To

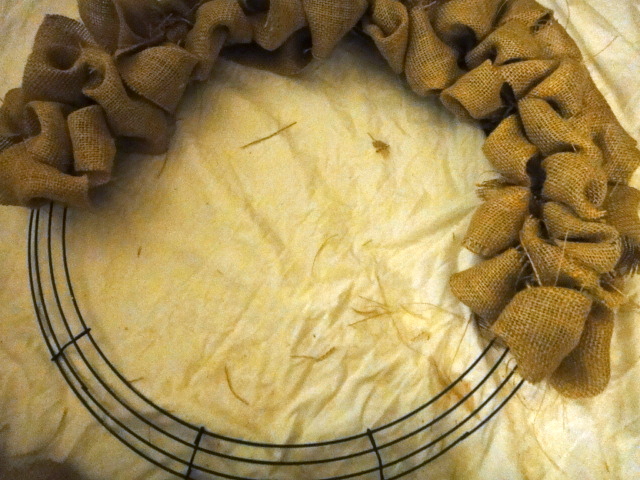
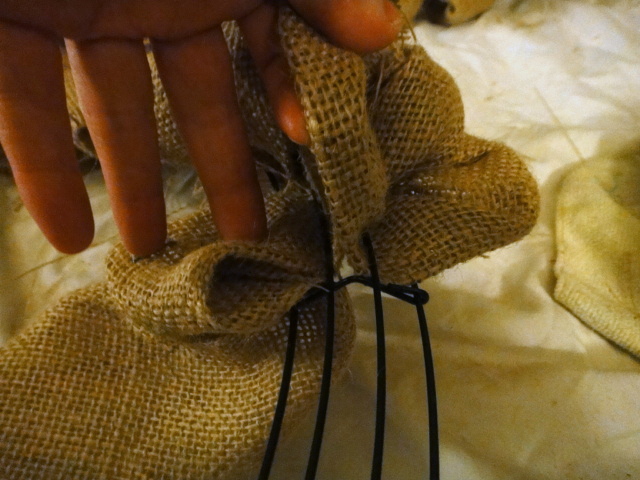
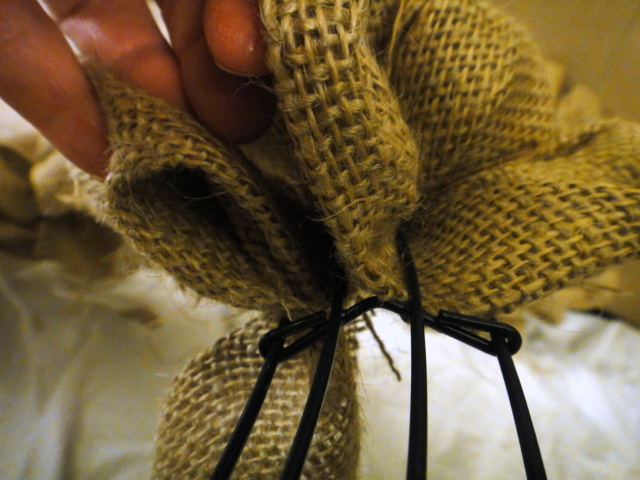
I started with a couple yards of burlap, which I cut into (roughly) 6″ wide strips. I have just found this way to be cheapest. You can buy already cut burlap, or burlap ribbon on a reel, but it does tend to be more expensive. The burlap ribbon is a nice option, because the sides are finished and makes a very clean looking wreath. Using strips like this, there is a lot of fraying that takes place and it can look a little messy if you don’t fold it and bunch it right. I folded the edges all down and hot glued them in place to hide any ugly edges. However, some people like the more rustic, messy look!

Yet Another Burlap Wreath All Things with Purpose Sarah Lemp 3

Tips

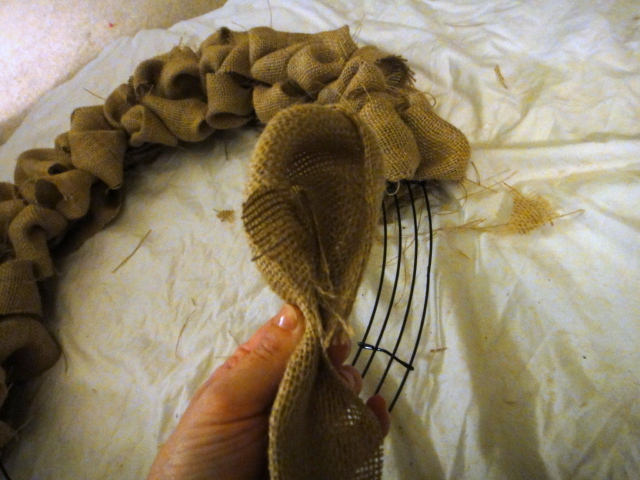
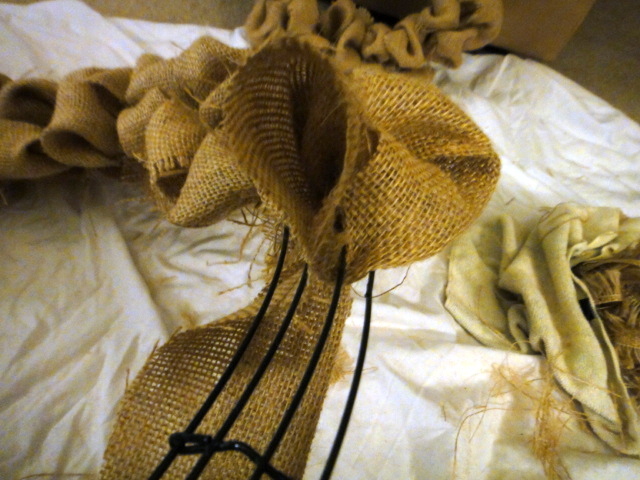
In the above picture, I am trying to show how you can form a loop, push it up through the wreath form, and then push 2 more loops up through. It is hard to explain, see the video below!

Yet Another Burlap Wreath All Things with Purpose Sarah Lemp 8
Category: At Home, Decor & DIY
FacebookPinShares17

About Sarah Lemp

Sarah Lemp is the owner and content creator at allthingswithpurpose.com and motorcitymouse.com. She has published 3 books, including an Amazon best-selling book on RV renovations. Sarah has worked personally with large brands like Meta, Disney and HGTV, sharing family travel tips and budget lifestyle content. Sarah is originally from Michigan, but now resides in Florida with her husband, Jay and their 5 kids. Sarah thrives on small budgets and can scale any size project to fit the means. She renovates ugly RVs and loves seeing old things become new. Sarah is a huge supporter of family travel because of the team-building impact it can have, and ability to cultivate an appreciation for other cultures and walks of life.

Reader Interactions

Comments

  1. Joselyn @ The DIY Spot

    December 29, 2013 at 2:04 am

    I bought the frame and wired edge burlap but never got around to making it in time for the holidays. Thanks for the how to video.

    Reply
  2. Corrina Kilfoy

    November 29, 2012 at 10:43 pm

    Oh good golly I wish I had watched your video and read your tutorial before i got halfway through my burlap wreath – Bwahaha you are a sanity saver – now to go unweave my stupid attempt at my burlap wreath and redo it the way you did it and save my sanity!! Thankyou!!!

    Reply
  3. Holley

    November 10, 2012 at 10:24 pm

    After watching you make this wreath with one hand, I decided that I probably could make one with two! Your wreath is lovely! Thanks for sharing!

    Reply
  4. Danielle Bartran

    November 9, 2012 at 8:54 pm

    I need to make one of these! I love it!

    Reply
  5. Marcia Worland

    November 6, 2012 at 10:27 am

    We just had a wedding using miles of burlap. Looking forward to a craft day to repurpose table runners into these beautiful wreaths to give for hostess gifts throughout the holidays. This tutorial is the best one I’ve seen. I actually think I can do this project thanks to your nifty video!

    Reply
    • Sarah Lemp

      November 6, 2012 at 2:42 pm

      I’m so glad you found this helpful!! How fun to have all that burlap to use on more fun projects, there are so many possibilities! :)

      Reply
  6. Anonymous

    November 3, 2012 at 7:40 pm

    So I am just finishing up my burlap wreath. I went with just getting 2 yards and cutting strips of about 8″ in width. I definitely recommend getting a burlap ROLL. I was struggling with all the loose/fraying edges. Kind of makes the process frustrating.
    Thanks for the great tutorial!

    Reply

Leave a Reply Cancel reply

Your email address will not be published. Required fields are marked *

Recipe Rating (Optional)


Sidebar

Hey, Friend!

We’re a big family on a small budget and we want to help YOU save money on your next Disney vacation! We’re excited to partner with Get Away Today for discount tickets, hotels and vacation packages. Click the link below or call 1-855-GET-AWAY and tell them I sent you!

Get Started
discount disney tickets

Follow on Instagram

follow me on instagram

MORE ABOUT SARAH

Sarah is a second generation homeschooling mom. Originally from Michigan, she now lives with her husband Jay and 5 kids in Florida. They love staying active as a family and going on trips in their renovated RV. Sarah loves to sing, make pretty things and eat pizza.

COPYRIGHT & DISCLOSURE

All content on this site is copyright Sarah Lemp. Many of my posts contain affiliate links. If you click on an affiliate link and buy something, I may receive a small commission. Read more on my DISCLOSURE PAGE.

  • Facebook
  • Instagram
  • Pinterest
  • YouTube
  • TikTok
  • Amazon
  • My Account
  • Media Kit
  • Privacy Policy

Copyright © 2025 · All Things with Purpose · All Rights Reserved · Powered by Mai Theme