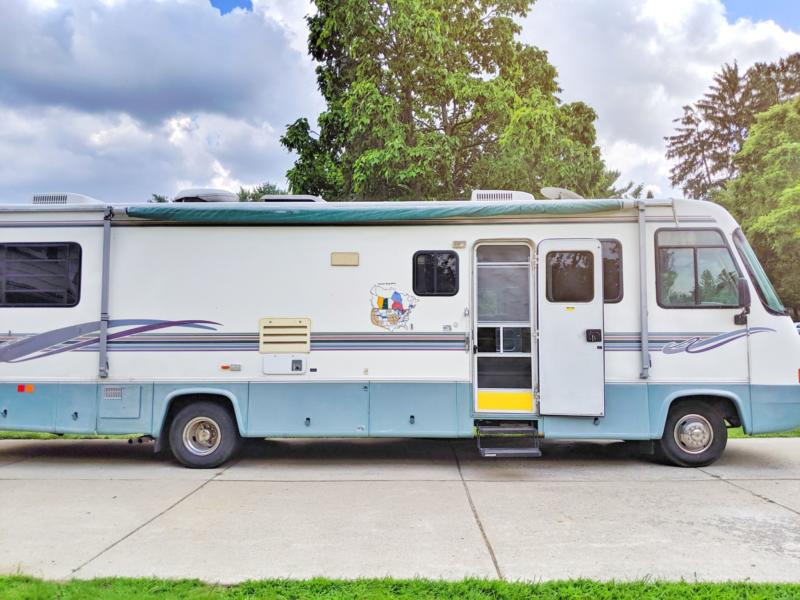
Class A RV
Hi, friends! Here is is, our big Class A RV renovation project that has been in the works for a few months now. I’m sorry I’ve failed to share all the details here on the blog. If you follow me over on Instagram or Facebook, you’ve probably seen some of my updates! I try to share all the progress, specifically in my Insta Stories. I’ve saved many of them in the highlights section.
After selling our Class C RV this Summer, we found a great deal on this Class A on Facebook Marketplace. We’ve renovated everything from a 1956 vintage trailer, to a 1995 Class C RV. We decided we’d like to experience something a little bigger with a slide-out! This is our first time owning something with a slide, and our family of 7 is excited for the extra room!
UPDATE! To see how this RV turned out, go here: Renovated Class A Motorhome
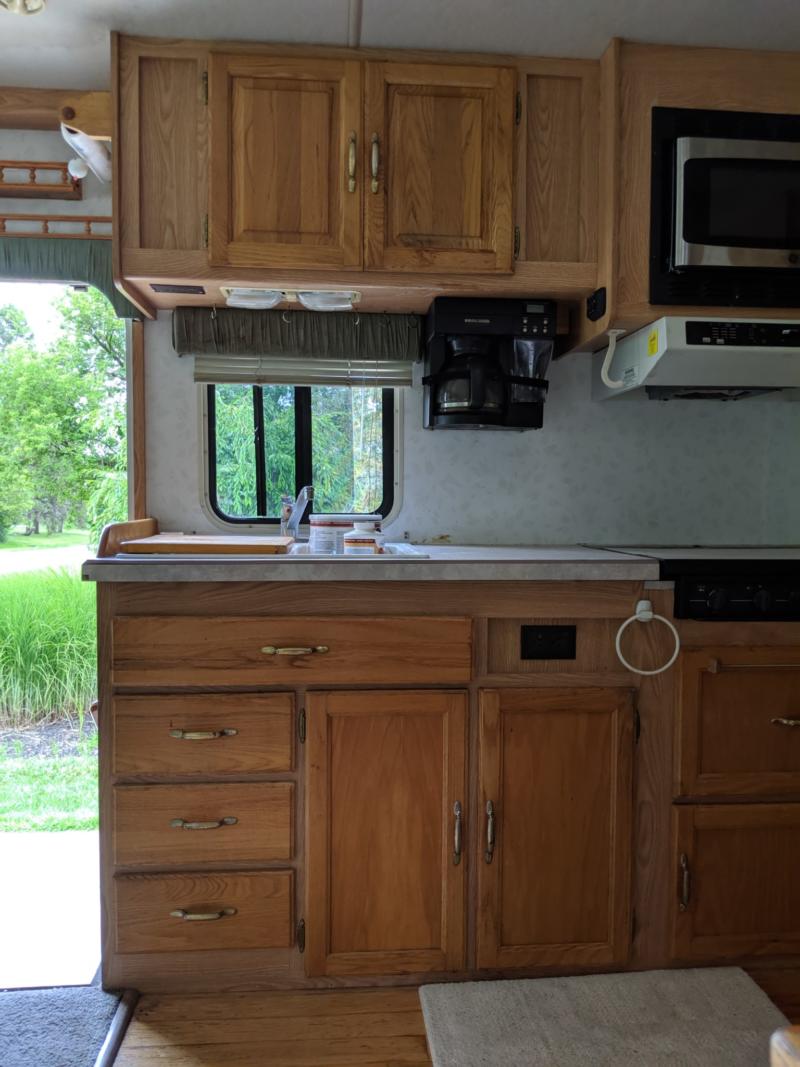
Before Pictures
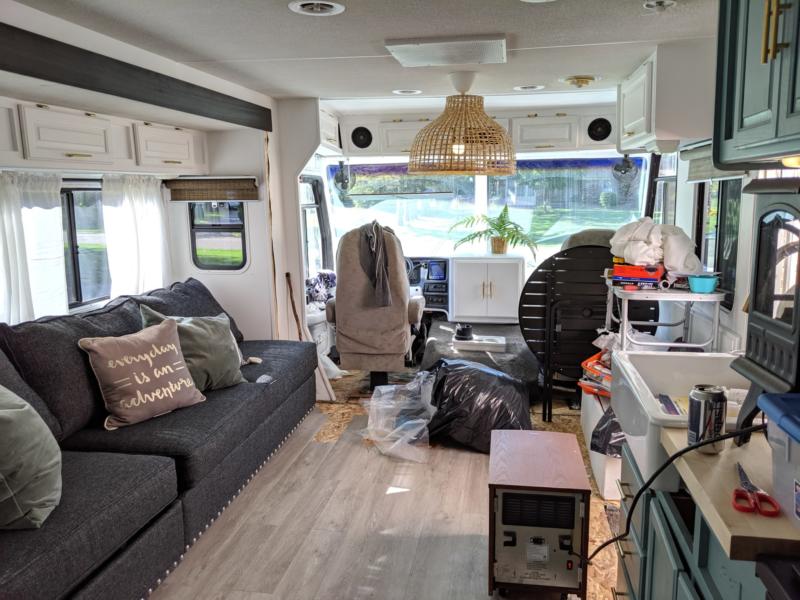
I’m sharing many of the before pictures today, as well as some shots of the progress. Obviously, this project is far from done, but it’s getting close! I’m excited about this room taking shape. With Winter on it’s way, I’m not sure I’ll be able to tackle the bathroom, rear bedroom or exterior yet this year. With this living area completed, the RV will be usable if we we’re itching to take a trip!
Read: How to Paint the Exterior of an RV the Easy Way

The To-Do List
Before purchasing, we inspected this RV, test drove it and asked lots of questions. We looked for water damage and soft spots. We tested whatever was possible to test at the time (AC, lights, slide-out, engine, fridge, etc.). The previous owner shared several things he knew had been updated or replaced by the owner before him. He also shared about the issues with the generator. We purchased this RV knowing that the generator wasn’t working, but we were hopeful it could be fixed. The purchase price was low enough to take into consideration any updates that would need to be done.
Read: The Cost of Renovating an RV
We always start our renovation projects with a general idea of what needs to be done. Here are the things we could anticipate right away:
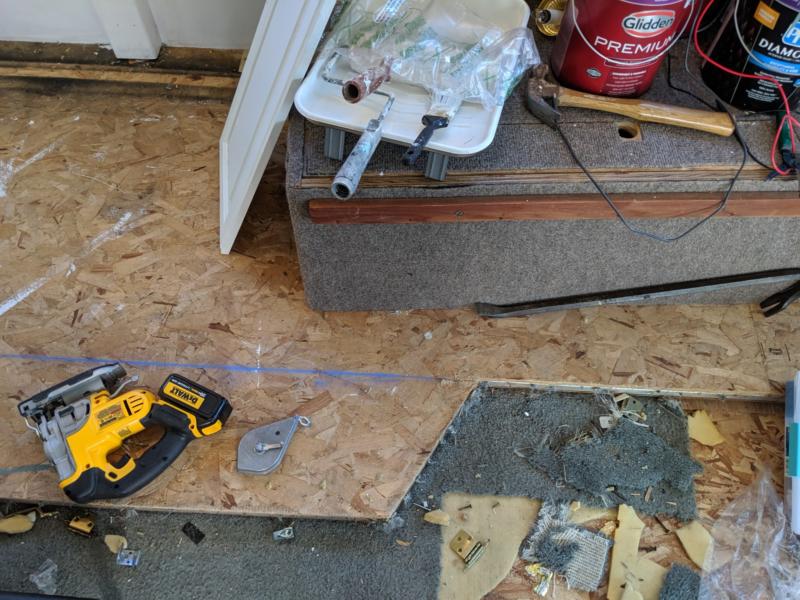
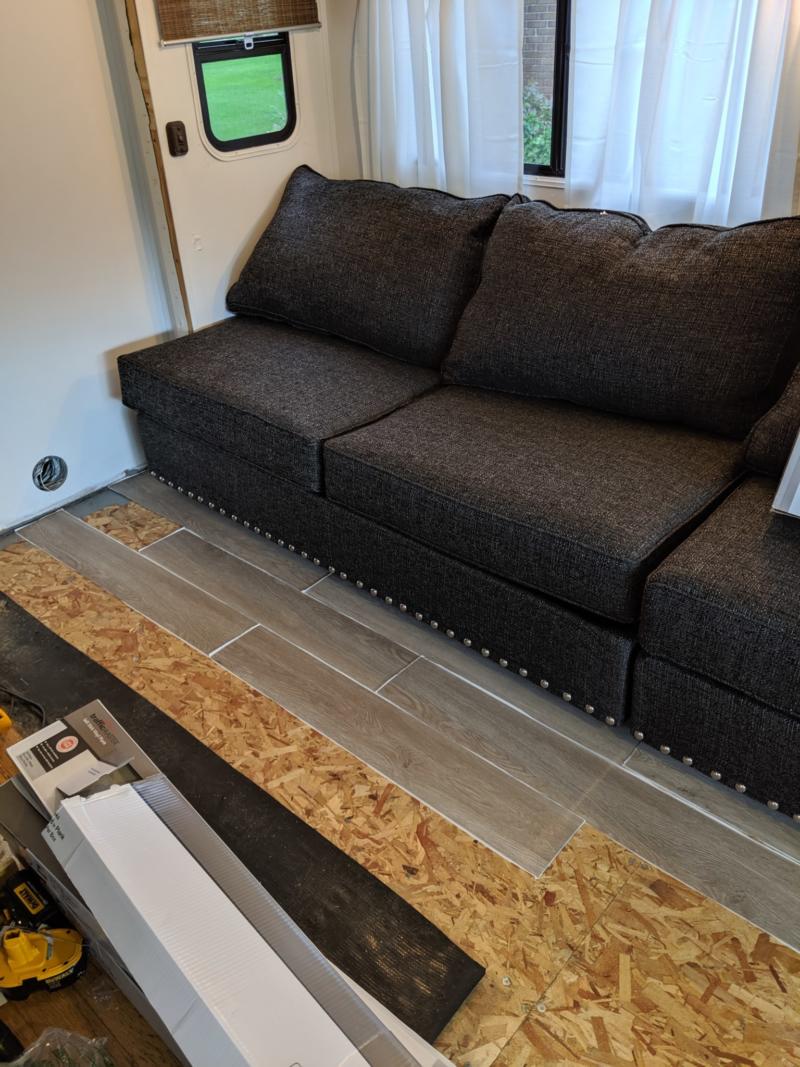
- Rip out carpet and replace with new vinyl or laminate flooring
- Paint walls
- Paint cabinets and replace hardware
- Remove trim around slide-out and replace
- Cut curved area of slide-out flooring to make straight
- Replace window coverings with bamboo shades or curtains
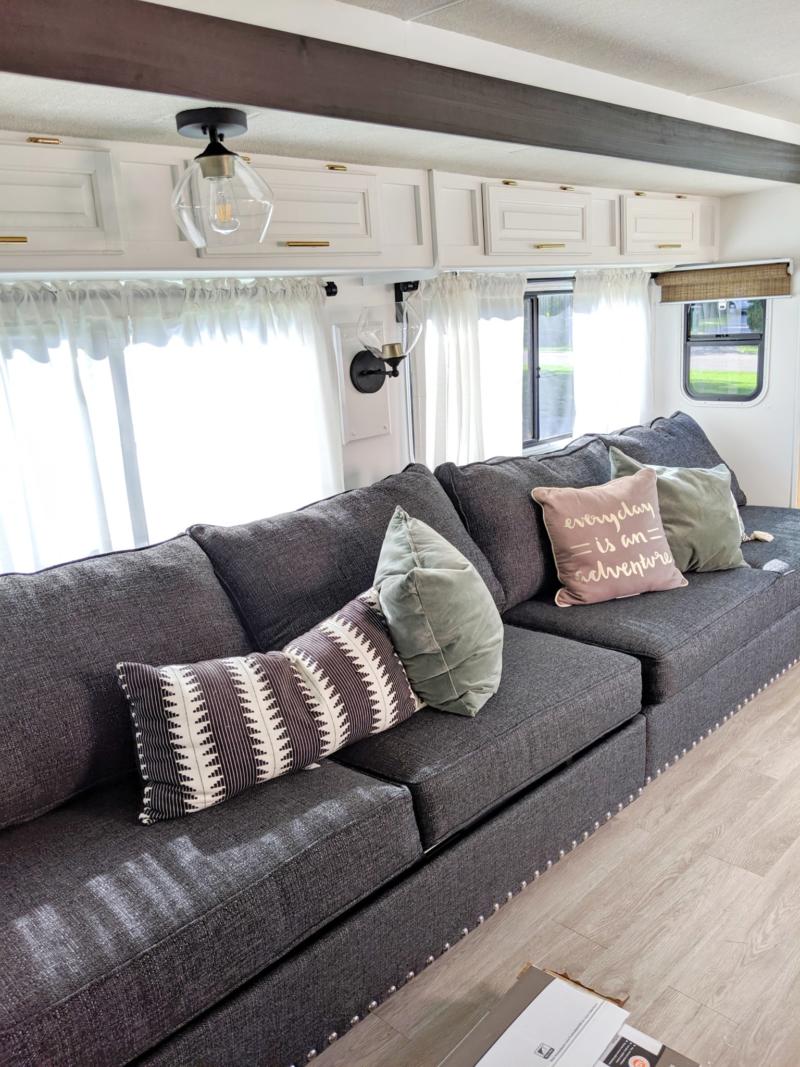
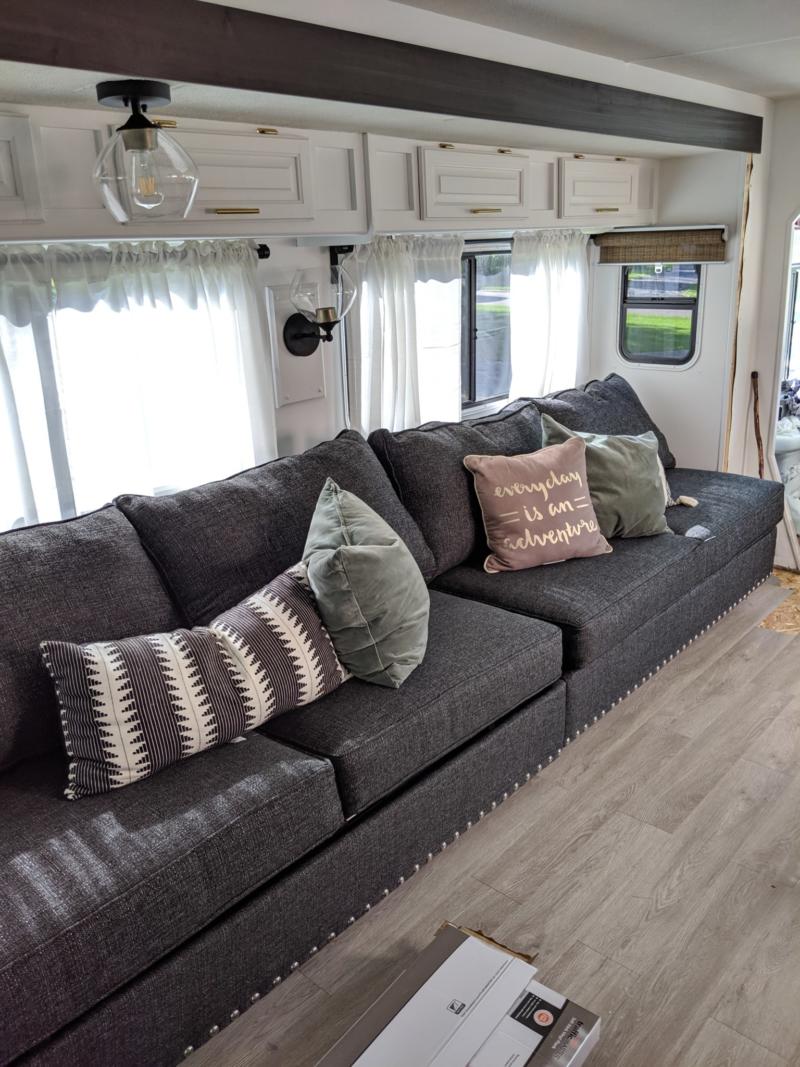
- Reconfigure slide-out layout and replace couch and dinette
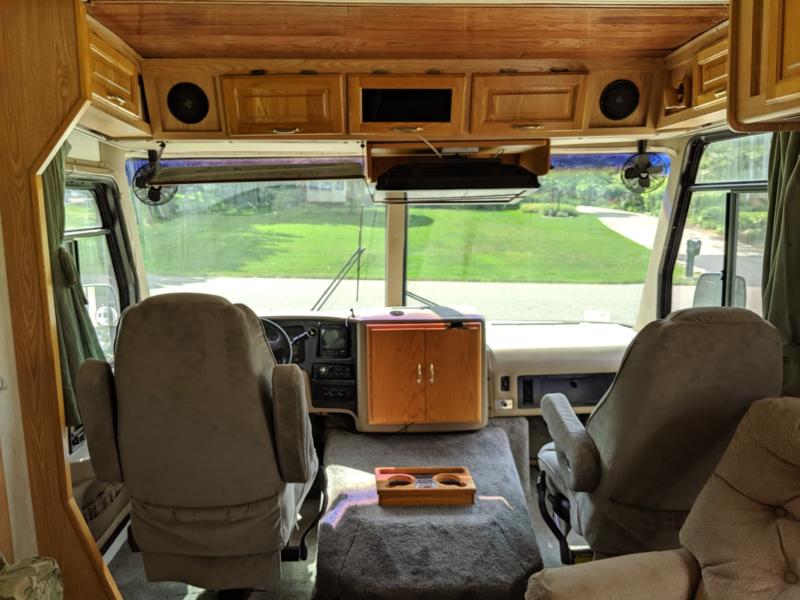
- Clean front captains chairs
- Clean and salvage curtain that goes across front window
- Paint dash
- Update lighting
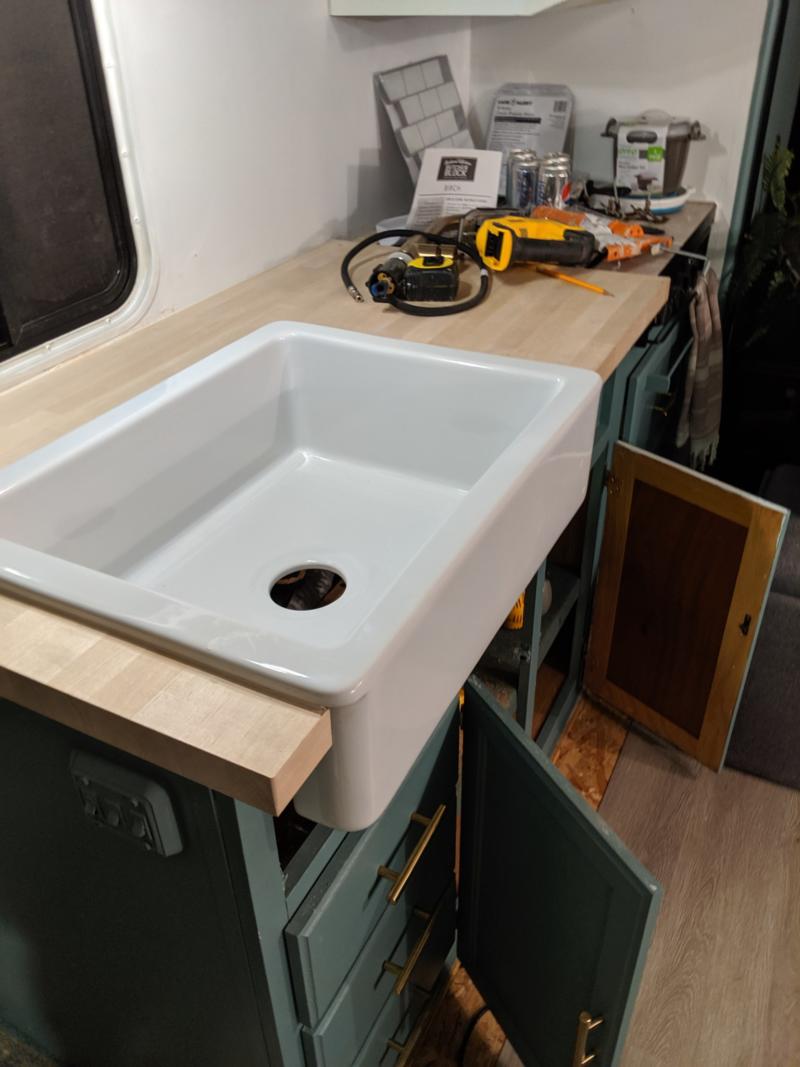
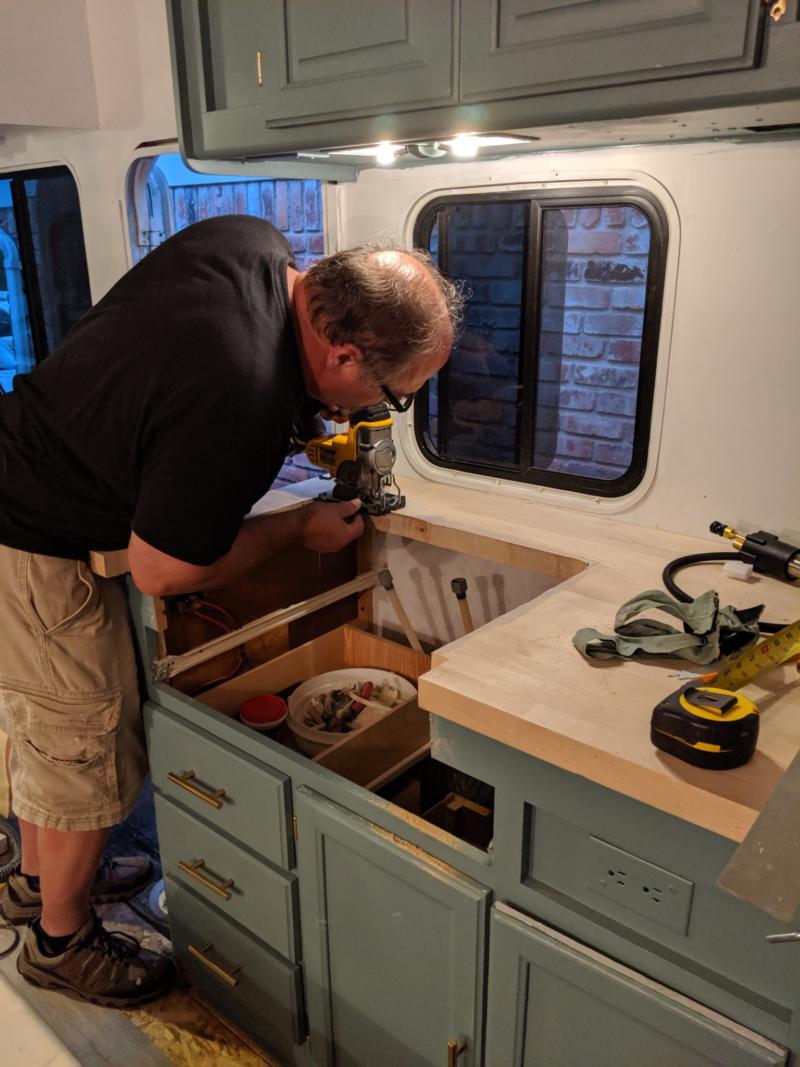
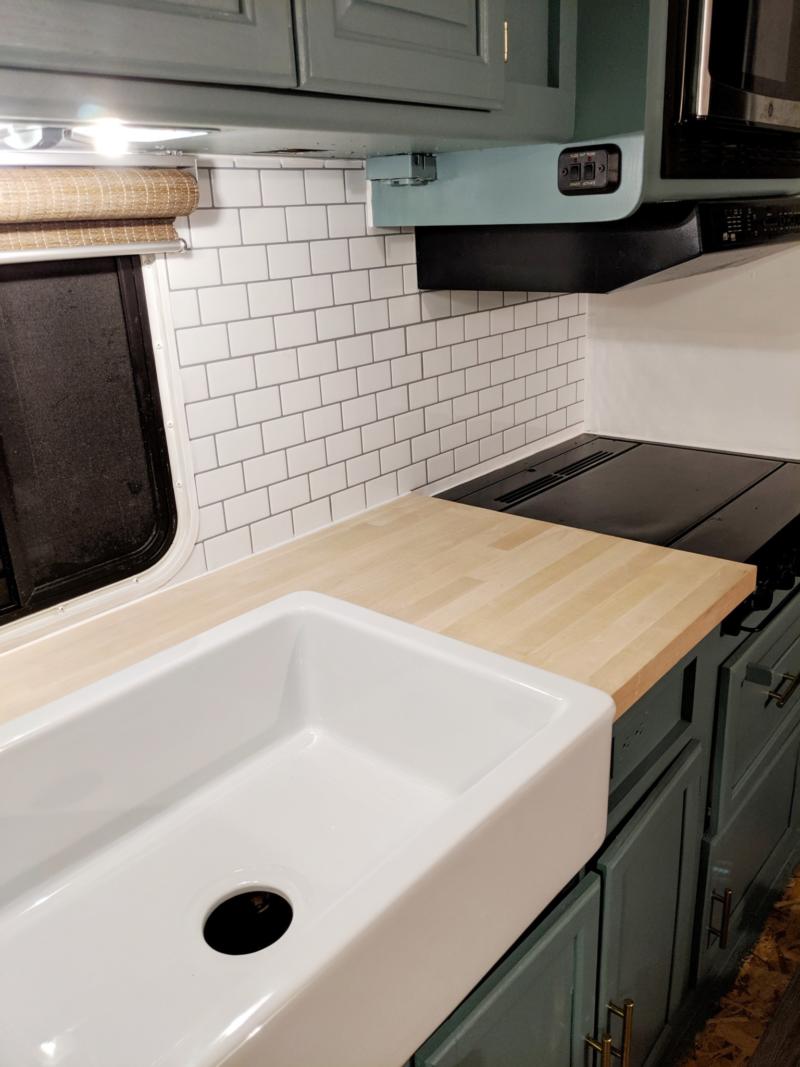
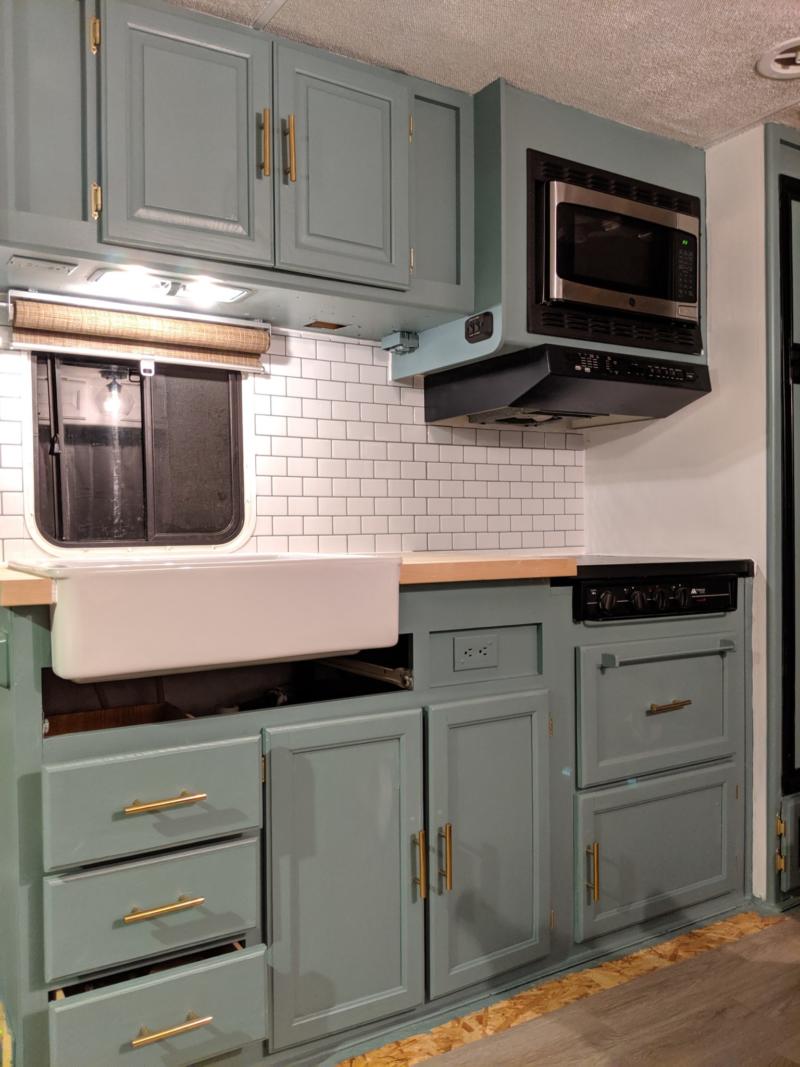
- New counter tops and farmhouse sink
- Seal outside from water, remove decals and clean or paint exterior
UPDATE! To see how this RV turned out, go here: Renovated Class A Motorhome
My Little Helpers
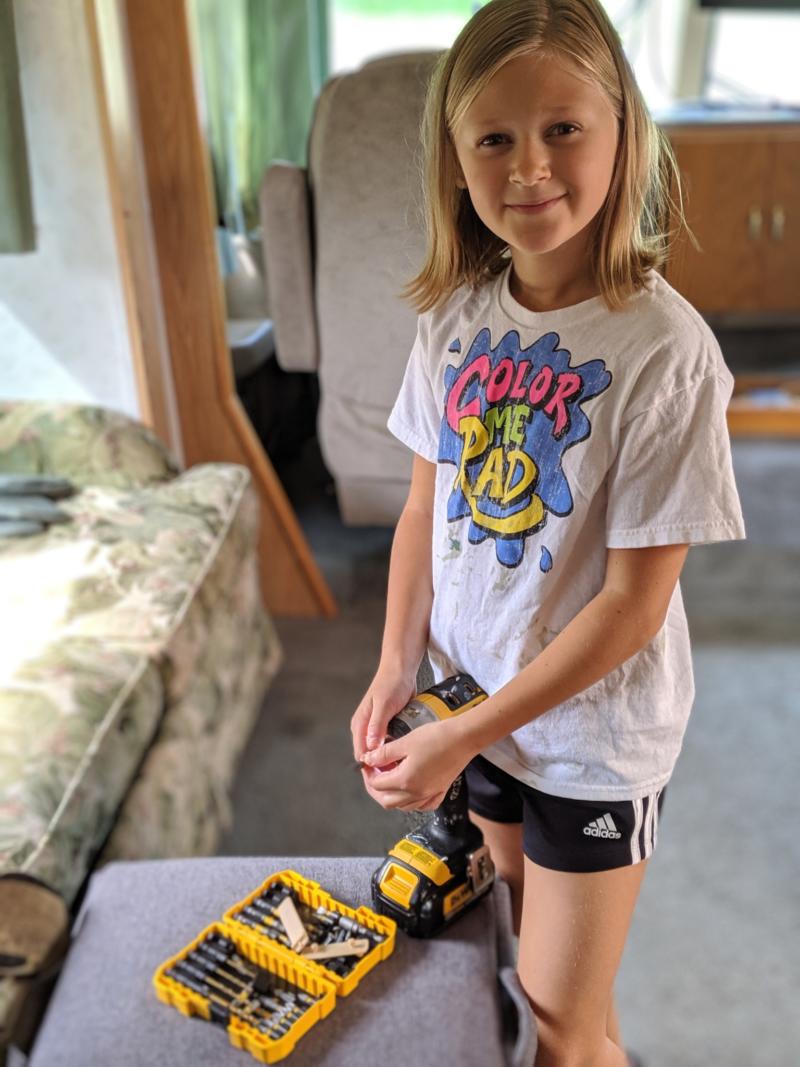
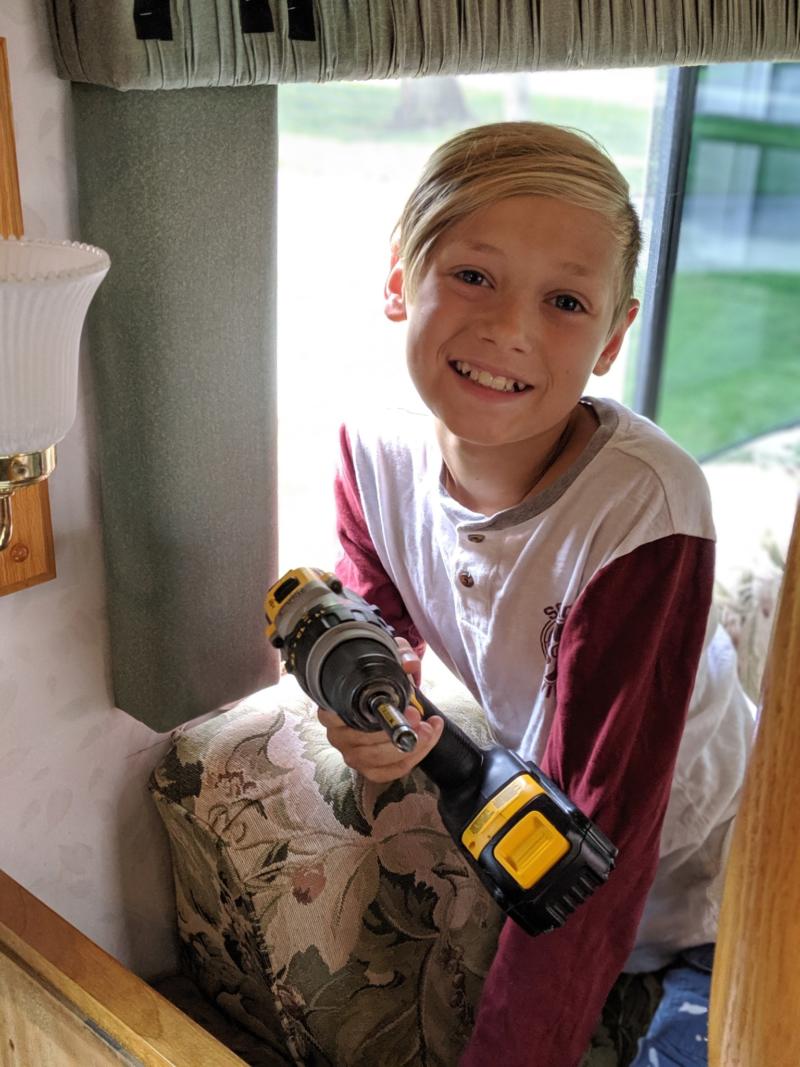
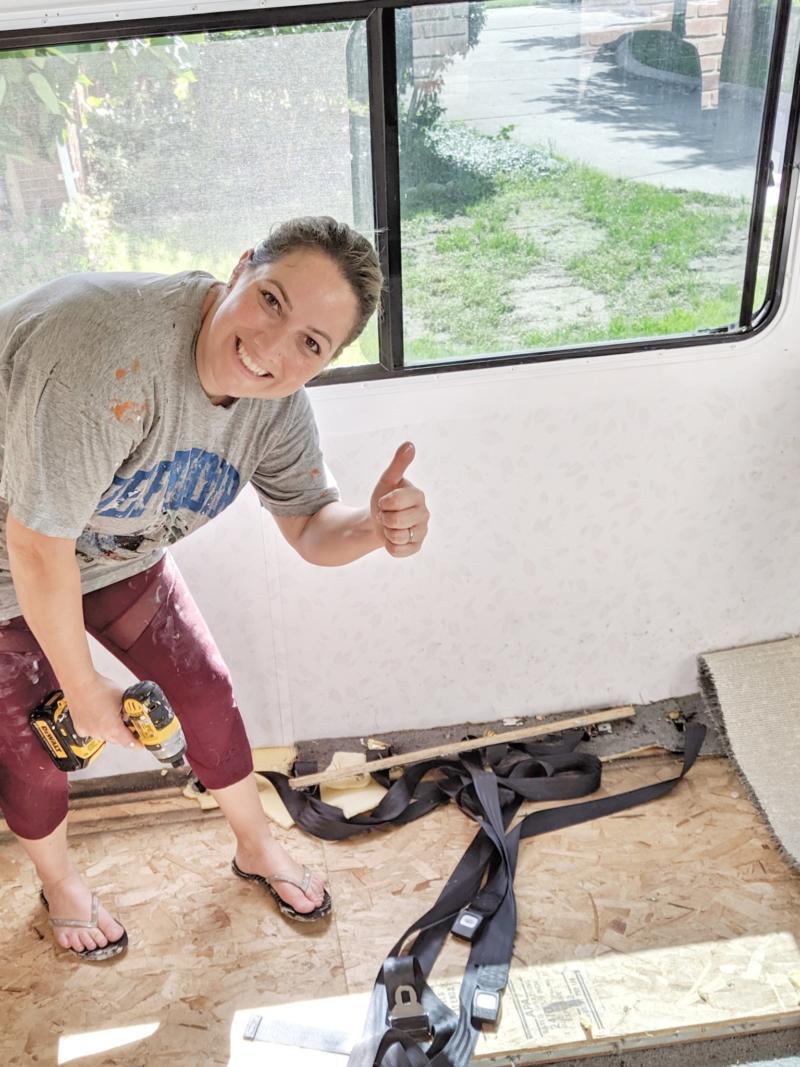
I get asked a lot about my kids and what they do to help. I’m pretty committed to including my kids in each project I take on. For one, I don’t want them to ever become bitter about my time spent working on these RV projects. I include them in each step of the progress. From searching for RV’s on Facebook Marketplace and visiting potential sellers, to negotiating the purchase price and setting a final sale price.
On day #1 of renovating, I always have the kids help with demo. They rip out fabric curtains, unscrew hardware from the cabinets and remove cushions. As each day goes one, there is always something little I can have them help with. We talk with them about the layout and what kind of beds they would like. My hope is that these little moments spent teaching them good work ethic and financial strategies will help them in the future! I also think it helps them appreciate the final project a lot more.
Read: Traveling with Kids without Losing Your Mind
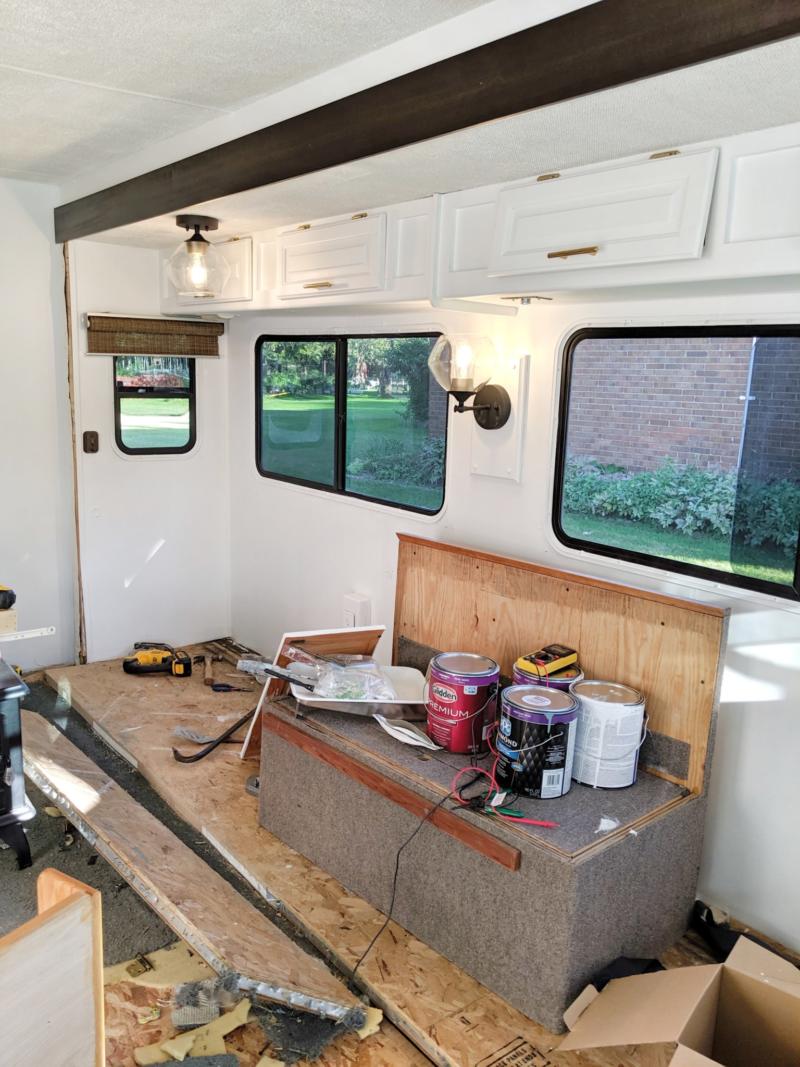

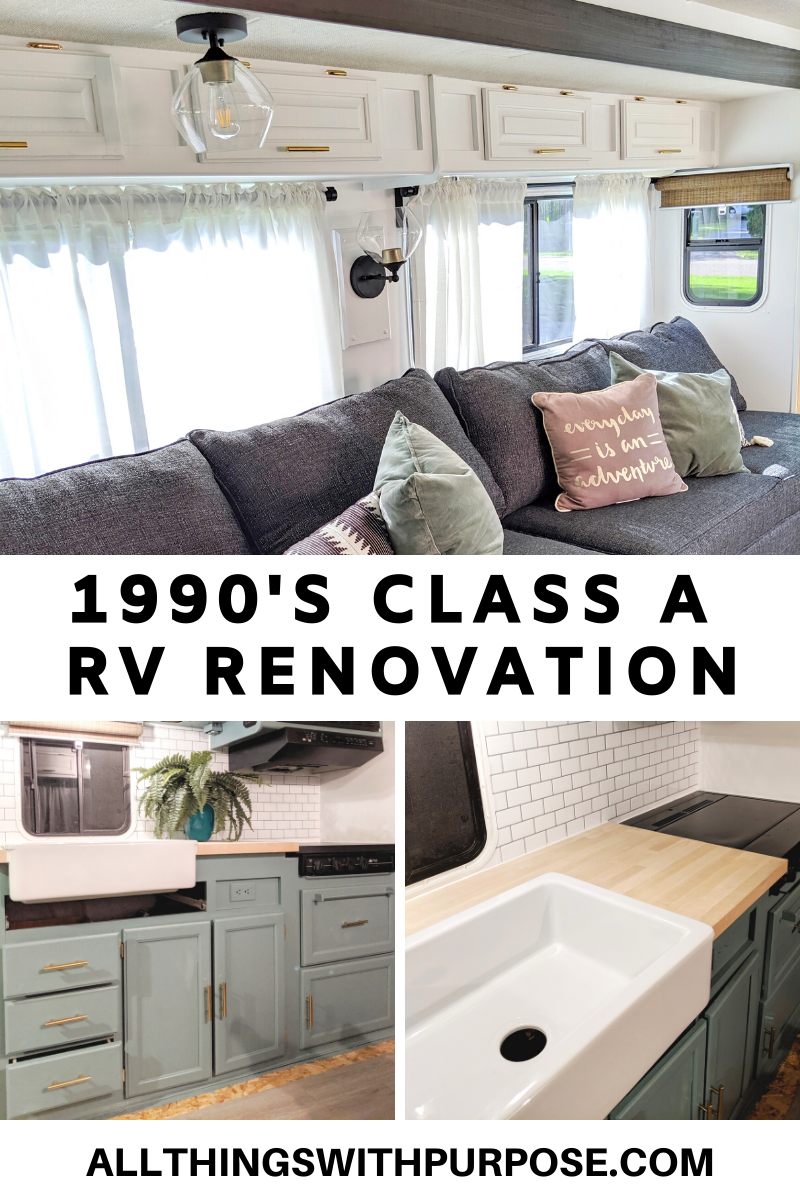
What We’ve Done so Far
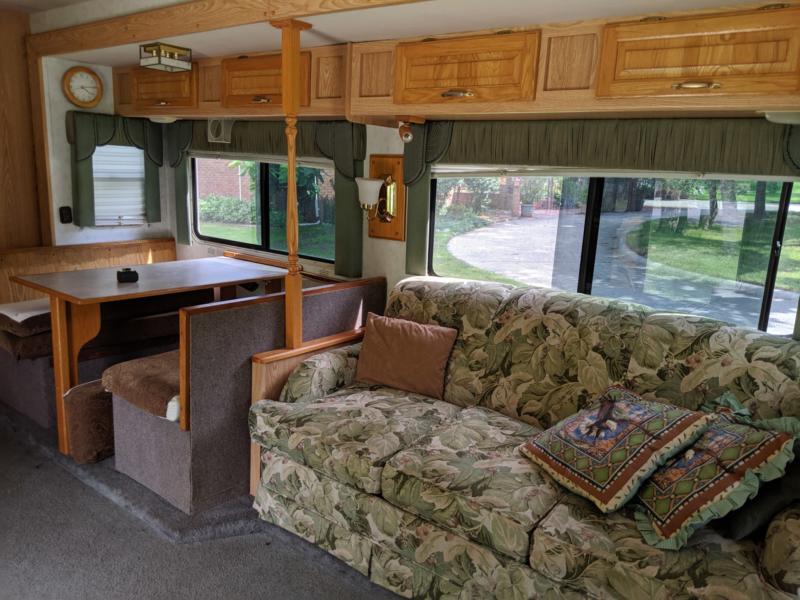
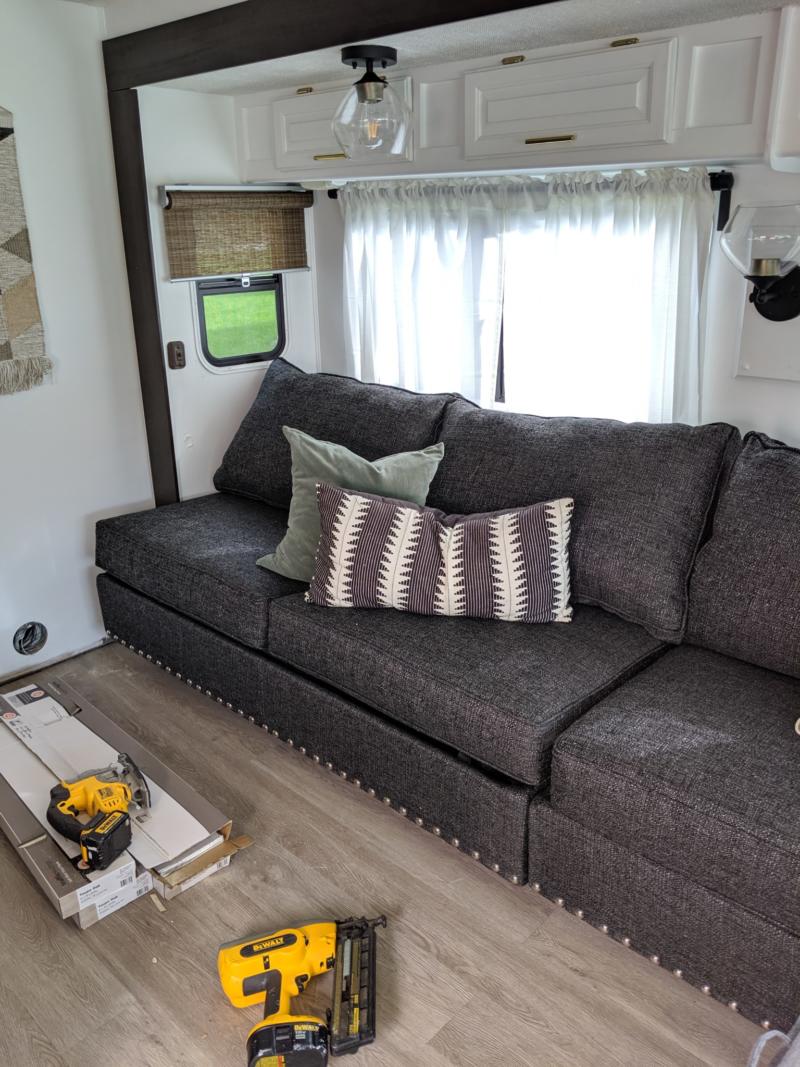
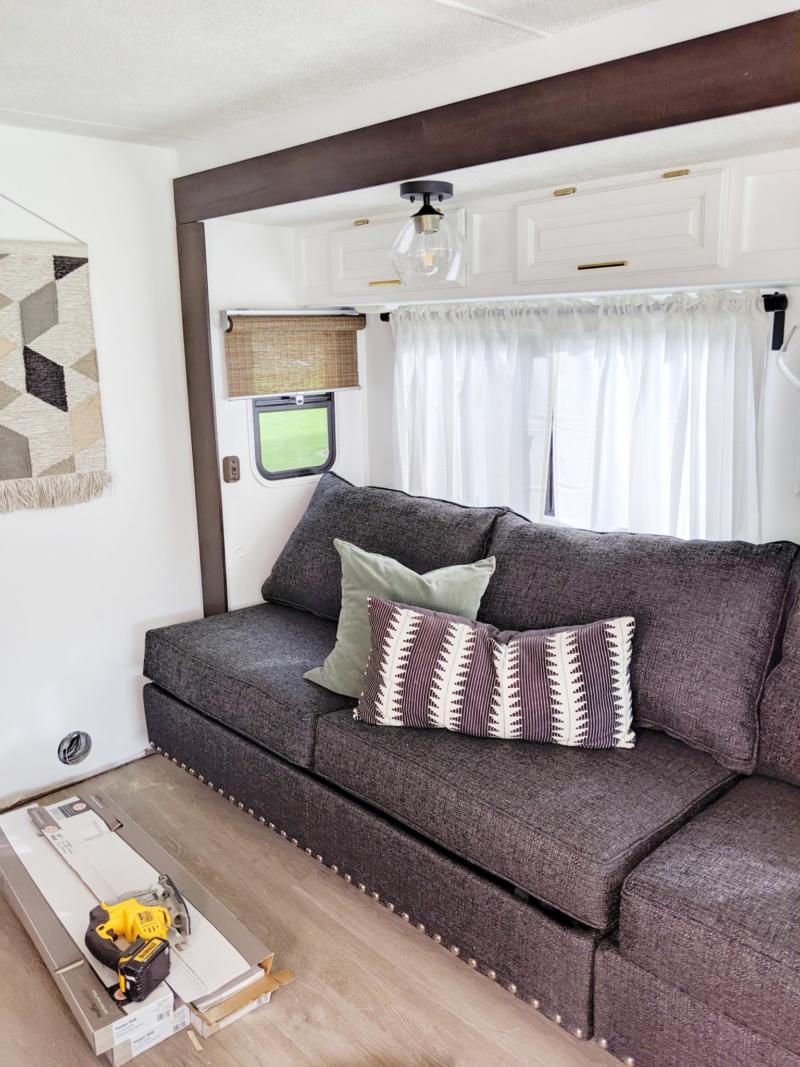
We had a lot of ideas for what to do with this slide-out space. I knew I wanted to do something different. We had grown tired of the traditional dinette and the process of making it into a bed every night. The challenge was to create a space that sleeps 5 kids, offers plenty of safe seating while on the road, and folds away easily during the day.
Here’s what we’ve done so far:
- We bought 2 armless sofa sleepers (from Bob’s Furniture) that fit together perfectly! These sofas each have a pull-out full-size bed. Each bed will have Beddy’s bedding to make clean-up a breeze.
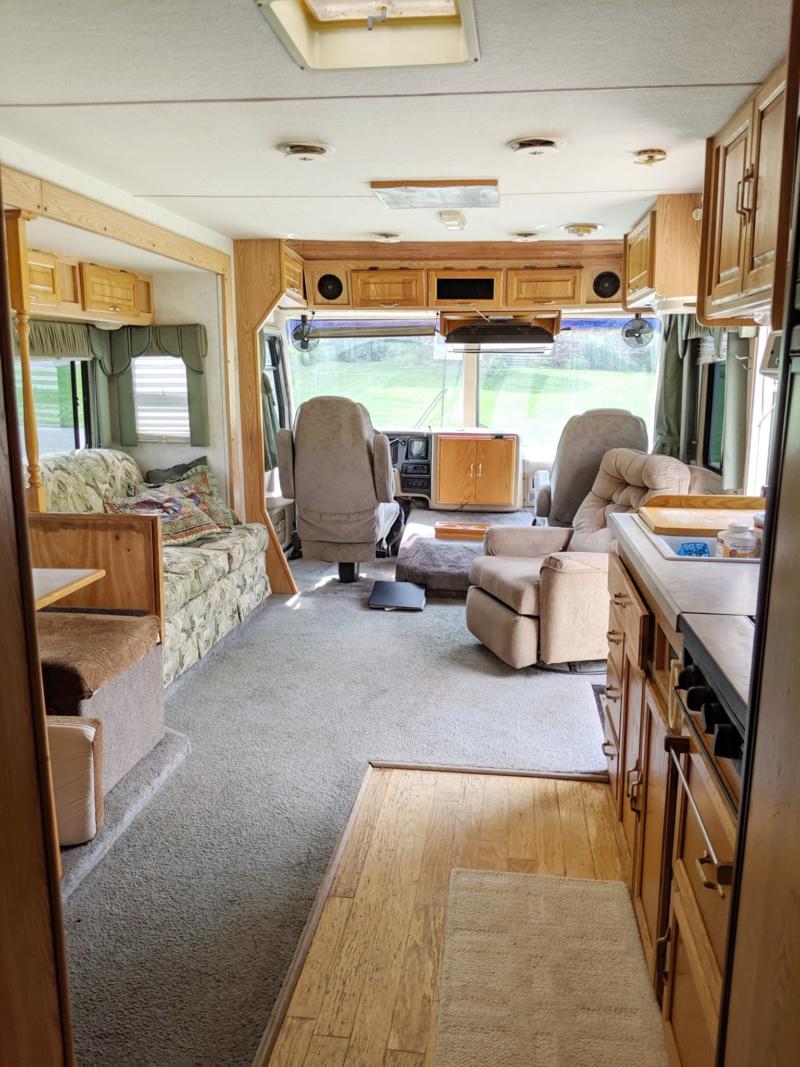
- I went with peel and stick plank vinyl flooring because out of all the flooring I have used, it’s the easiest! It was also one of the cheapest options. I would only recommend this if your floor is super level and smooth. Tip: Install when it is hot and humid. If you lay your flooring in cool temps, it will expand in warmer weather and bubble up!
- We painted everything using Glidden Gripper primer and Glidden white paint. I usually use Behr Marquee, which is more expensive, but I wanted to compare the difference. I’m not sure the end results are different at all. Glidden primer and paint was cheaper and took more coats, while Behr Marquee is more expensive but covers in fewer coats.
- The 2 armless sofas are from this sectional at Bob’s Furniture
- I used IKEA white curtains and woven shades
- The counter tops are real Butcher Block counter top from Home Depot. I needed such a small piece, it was worth the splurge!
- I used this IKEA apron-front sink
- We purchased this faucet from Amazon
- The cabinet color is Glidden “Scarborough”
- Find the lights we used here
- I love Tick Tack Tiles – I have used them many times and used their Subway Tile for the kitchen backsplash on this project
- Here is the large IKEA basket light
- I painted the dash with the same primer and paint that I used on the walls!
Shop This Post
[show_shopthepost_widget id=”3765316″]


Other Must-Have Products
Here are a few of my favorite items to have on-hand for renovation projects like this:
Stay tuned for more updates to come! Be sure to follow me on Instagram: @Purposeblog
Shop This Post
[show_shopthepost_widget id=”3765321″]
Frequently Asked Questions
Q: How do I get my peel and stick tile or wallpaper to stay on the wall?
A: I always recommend an additional adhesive with peel and stick. I also recommend you install over a matte, smooth finish. If walls were recently painted, make sure they have fully cured and are not glossy. Be cautious with extra adhesive, too much can oversaturate the wallpaper or tile and make it bubble. This is the one I use: Spray Adhesive
Q: Where did you get your roller shades from?
A: The roller shades I used in the kitchen and slide are from IKEA. They are sadly out of stock/discontinued right now. I loved them and they were pretty affordable but only went up to about 48″ wide. I have found that it’s pretty hard to find shades any wider than that, without spending a fortune. This is why, on larger windows I usually use curtains instead. I have a few options linked in my Amazon shop: Amazon
Q: What color is the kitchen cabinet paint?
A: The kitchen cabinets are Scarborough by Glidden
Q: Do you bolt your furniture to the floor?
A: We bolted the sofa to the floor using L brackets, which is exactly how the original one was attached.
Q: Where did you get seatbelts for your RV?
A: This RV came with seatbelts already down inside the original sofa. They are bolted to the floor and brought up through the couch. We were able to use these original seatbelts and also bought a couple extra on Amazon, which we bolted to the floor.
Q: Where is your couch from?
A: Our couch is from Bob’s Discount Furniture. I believe it is now discontinued, but you can follow the same strategy that we used. At Bobs (and IKEA) you are able to buy specific pieces of a sectional sofa, rather than the entire thing. We simply bought 2 of the armless sleeper sofa sections that would have normally been put together with other parts to create an L shaped corner sofa.
Q: How do you get your sofa through the door?
A: We measured this particular sofa out to make sure it would fit through the door. It did come partially put together. I recommend sofas from IKEA and Amazon because they generally come in pieces and can be assembled from inside the RV.
Q: Where do you eat now that you took out the table?
A: We use a folding table that gets stored when not in use! It gives us so much more flexibility with our space!
Q: How did you paint your RV? What prep did you use? Can I paint over RV wallpaper?
A: I answer all these questions in this post: Painting RV Cabinets the Right Way and this one: How to Paint RV Walls
Pin-It for Later!
Brian J Emeney
I’m always amazed at how big these things are! Here in the UK, most people can only drive vehicles up to 3500kg weight, so we rarely see them. A friend bought an old 1980s A class motorhome and that seemed huge when she parked it on our drive. She struggled to drive it as it had no power steering!
Kayelyn Blackstock
Where do you buy the sink and faucet
Nancy
Love this redo but disappointed that the questions were not answered.
susan merriott
Hello! I love your renovation! I installed the subway tiles in my RV too, but due to our California heat, they are coming off. Did you use any glue on the peel and stick tiles? I’m about ready to tear them off and install wallpaper subway tiles instead. Any suggestions would be appreciated!
Sarah Lemp
Hi Susan! I’m sorry you haven’t had a good experience with the subway tile. I always recommend an additional adhesive with peel and stick. I also recommend you install over a matte, smooth finish. If walls were recently painted, make sure they have fully cured and are not glossy. Be cautious with extra adhesive, too much can oversaturate the wallpaper or tile and make it bubble. This is the one I use: https://amzn.to/3RqYLrJ
Jonna
Hello! This is beautiful! I was wondering where you got your roller shades from and why you didn’t use them on the windows behind the table and couch? Thank you!!
Rachel
Hello there! Love what you do and kind of curious about painting the dash area?! Do you happen to have photos of this area to see? Also, what did you do with the dog kennel carpeted area? I am stumped on what to do with ours. Thank you SO much!
Sarah Lemp
Hi Jonna! The roller shades I used in the kitchen are from IKEA. They are sadly out of stock/discontinued right now. I loved them and they were pretty affordable but only went up to about 48″ wide. I have found that it’s pretty hard to find shades any wider than that, without spending a fortune. This is why, on larger windows I usually use curtains instead. I have a few options linked in my Amazon shop: https://www.amazon.com/shop/allthingswithpurpose
Tammy
What is the color of the kitchen cabinet paint?
Sarah Lemp
The kitchen paint is Scarborough by Glidden :)
Cory
Where did the couch come from? It is exactly what I’ve been looking for! 8)
Lindsay
Did the armless sleeper couches come in pieces? We are thinking about them for our camper but nervous about fitting it through the doorways.
Barbara Gonzalez
Where did you get your farmhouse sink, and what size is it??
Dianna K Greer
In the article Sarah says the sink is an IKEA.
Heidi
Where did you get the sconce lights?
Gayle. Halbakken
Where did you purchase the window coverings?
Ellie
Did you bolt the sofas into the floor? how do you keep them from shifting?
Sarah Lemp
Yes, we bolted it to the floor using L brackets :)
Sue
Where is your dining area now ?
Tara
Where did you find the couch…..
Sarah Lemp
Our couch is from Bob’s Discount Furniture. I believe it is now discontinued, but you can follow the same strategy that we used. At Bobs (and IKEA) you are able to buy specific pieces of a sectional sofa, rather than the entire thing. We simply bought 2 of the armless sleeper sofa sections that would have normally been put together with other parts to create an L shaped corner sofa.
Alyssa
Do you have a link for the couches you purchased? I am having a hard time finding something that I am in love with that will fit our 154” slide and still stay in budget.
Jessica C
Can you tell me what color you painted the cabinets? Started our Reno this past weekend and I love this look!
Sarah Lemp
Yes, it is “Scarborough” by Glidden! :)
Tracy J McGoldrick
Can you paint OVER the wallpaper or do you rip it down?
Patty
Don’t attempt to take it down it’ll be a disaster. Use a really good primer that has a good bonding ( I used Stix) and then your interior paint. I personally find Benjamin Moore’s Aura the best there is. It’s more expensive but you need to add way less coats of paint. I’m always reading how many have to paint 4-5 coats not including the primer and I only painted 2 coats. It’s SO worth the effort. Do it!
June Laprade
I love what you did. Do you remember where you bought the bamboo shades?
Great job Sarah!
Sarah Lemp
Hi June! They are from IKEA :)
Roxanne
Great job! I too would like to renovate our 90’s RV and I love the white but wanted to know how you got the ceiling white. Ours has a fuzzy type material on it and it doesn’t appear to be paintable. Thank you!
Sarah Lemp
Hi Roxanne! This is what we did to our ceiling: https://www.allthingswithpurpose.com/rv-problem-solving-painting-a-carpeted-ceiling/
Diane
This post is about 8 months old, so I’m wondering— did you finish this reno? I’m interested to see how the cockpit area was completed. Did you leave the “doghouse” carpeted? And I’m interested to know if you took the carpet up on the slide out under those sofas. And where do you all sit to eat a meal?
Also, the paint you used— water based or oil based? How many coats did it tKe to get those beautiful white walls?
So interested in your work and your methods. I’m getting ready to embark on a renovation of a 37’ class A. Would love to hear from you!
Charlotte Simmons
Your post was so helpful. I clicked on the link for Bob’s Furniture for the armless full sleeper sofas but wasn’t able to pull it up. I visited the website too but can’t locate, and am VERY interested in this concept. Would you mind giving the measurements for each sofa and the width of your slide out where you placed them? I want to do this exact thing!
Rebekah
I would like to know also. Cant find these anywhere.
Sarah Lemp
Our couch is from Bob’s Discount Furniture. I believe it is now discontinued, but you can follow the same strategy that we used. At Bobs (and IKEA) you are able to buy specific pieces of a sectional sofa, rather than the entire thing. We simply bought 2 of the armless sleeper sofa sections that would have normally been put together with other parts to create an L shaped corner sofa.
Mary
Hi Sarah, the changes looks great! Love the sink and the cabinet color!
The tip about putting down the flooring…does that apply to the wall peel and stick also?
I assume the two sofas are the slide out? Does the furniture have to be “bolted” to the floor (for safety)?
What do you do with the hardware/furniture you pull out? Can’t wait for the next update! Thank You
Barbara Dyer
Hi Sarah,
Did you prep the cabinet surface before painting? What is the best paint to use? Did you paint the ceiling too? What tips can you give for redoing the floor as I want to go over older vinyl ( which has a combination of carpet & vinyl) with the plank type tiles you have used? Have you ever run into floors that have a squeak in some places? Any thoughts on how to tackle that? Is it worth $$$ to recover present seats with different fabric?
Your work is inspiring — just am hesitant to start and not make things look better. :(